Mukluks

imageI bought a pattern earlier this summer to make a pair of slipper socks for a former student to whom I had become very attached. I knitted them up and sent them off to Florida. A few days later I got a picture on Facebook with her wearing them. Mom reports that she loves them. I’m so glad. Recently I made a pair of baby booties for my new niece Lilah Wise and I wanted to make something for my niece Faye Carleton, the big sister. When her mom told me that her feet were pretty big, I decided that these mukluks were a good idea. And I had the yarn in my stash in the cabin. (I totally miss my yarn stash that is in storage and I can’t wait to get it back and organized in my new studio in our new house. But I digress.)

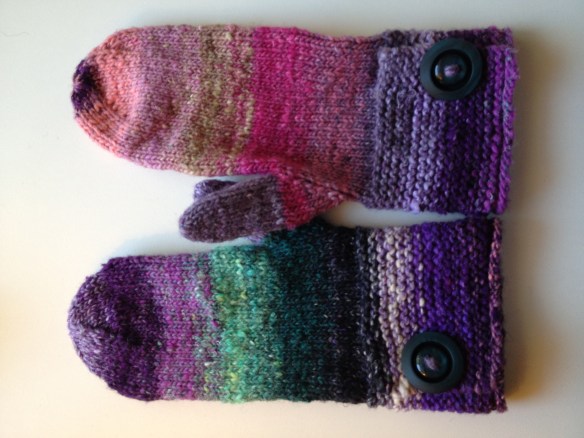
The Childrens Mukluks pattern by Diane Soucy are really cute, quick to knit up in a bulky yarn, and I think they’re a.so super toasty. The pattern is a classic with clear directions to follow. Starting in the center of the sole, the foot is knitted first from the sole and then the toe with a seam sewn at the very end. The first part is done on US 7 straight needles. Once the foot is finished, the cuffs are knitted in the round on DPNs. Several rounds of knit and purl make up a cuff that looks like Alaskan mukluks; a little bit poofy as if they were made of animal hides in the good old days. I think I’m good with knitting mine!

There is a similar pimageattern for adults and I would suggest that if you want to knit a simple and warm winter gift for someone else or for you, pick this one. It’s quite remarkable. I plan to buy and knit the adult slippers for at least one adult this Christmas!

The colors of the yarn don’t really show up as they really are but as I was knitting the tiny ones for Faye, I realized they were in “Frozen” colors (think Elsa and Anna) and these have started a very dangerous Frozen-themed gift buying spree. I am heading to California on Thursday to meet my nieces for the first time. I’m so excited!!!

Gone knitting!

Blue Beanie Beret (Knitted Beret)

I needed to do some selfish knitting between the Christmas gifts that I’ve been making this year. Mostly because I needed some mittens for our trip to the North this winter.

Lovely by Suann Wentworth

Lovely by Suann Wentworth

I dug some Noro Taiyo Aran yarn out of my stash. It was calling to me to be knitted up. But as my friend Beverly says, I gave the mouse a cookie and you know what happens when you feed the mouse? I needed a hat.

I remembered seeing one in this book (on my shelf. One of these days I will attempt to knit a tea cozy or two from the book … which is why I bought the book in the first place.)

IMG_4039

The hat in the book is called Blue Beanie Beret. Mine is anything but blue … more pink, purple, teal, purple, green, and did I mention purple? While purple is not necessarily my favorite color, I love the colors that are in Noro yarns and this one is no exception.  I do think I would like to make another hat in a plain or tweed yarn because it’ll be very different.

This was a simple knit on circular needles starting at the top of the hat and knitting to the brim. Because the yarn is bulky (heavy worsted, actually) it knits up very quickly and I had the hat completed in a couple of days. Easy peasy!

Top of the hat … lovely!

Top of the hat … lovely!

Construction starts at the top of the hat with eight stitches … Increasing to make the beret top and then decreasing to where it is knit plain and ending with a stretchy bind off. Loani Prior has designed a great hat that I am eager to wear!

The finishing touch was/is a little rose. It is the designer’s intent for you to knit it in a contrasting yarn. Mine is in the same yarn because I was lazy. (I’m honest.) I have a bit more of the yarn and it’s the teal part of the colorway which I think might be a nice (nicer?) contrast on the rather pink brim of the hat. I’m going to sew mine onto a pin so that I can wear the hat with or without the rose.

A rose is a rose ...

A rose is a rose …

I think my Lovely mittens and my (Anything but) Blue Beanie Beret are wonderful. Can’t wait to wear them at Christmas time when I’m up in New England!

Gone knitting!


Holiday Knitting

Knitting Project #1

Knitting Project #1

I’ve had this yarn in my stash for years. Yes, years! I bought it at the Fiber Frolic from Oasis Bunny Farm … it’s angora yarn. I wanted to make something for my college roommate. And I thought it was so soft and neutral … I’ve just had a challenge finding something that I really love as I get knitting. This is the third or fourth time that I’ve started a project with this yarn and I hope this one will finally be one that I love.

Noro Nadeshiko

Noro Nadeshiko


The second project, one that wasn’t necessarily planned, is my slouchy beanie. The pattern was one that my knitting girls in Maine had been knitting – with chunky yarn so it was a quick knit – and I had no hat and it was 16 degrees! So I picked out a skein of Noro Nadeshiko (color way 29A) and the pattern Relaxed Beret by Denice Sharp and off I went.


Bermuda ShawlBermuda Shawl

I also finished my second iteration of the Bermuda Shawl with my Noro Silk Garden Sock. I have to hunt for the yarn label and update my Ravelry projects. For some reason, I didn’t write it down. Oops! I love the shawl and have worn it as a scarf for the whole trip! It’s light enough that I can wear it in Florida and adds warmth in Maine. This is a wonderful pattern and one that I highly recommend for someone who wants to learn about short rows! It’s quite a wonderful exercise in short rows (which I love!) I’ll add more pictures soon.

(Queen Bee’s Note: I’ve “frogged” the angora scarf. Yet again! Just wasn’t feeling the love for the pattern that I was knitting. I’ll try again … maybe something in a nice herringbone?)

Gone Knitting!

Non-Felted Slippers by Yuko Nakamura

I got to Maine this summer by air. Typically we drive together but since I had to work, I had to fly. SO … I could only bring a suitcase and a carry-on bag and I needed to bring my yarn which meant that I didn’t have any slippers to wear when I got here.

What the yarn was going to be ...

What the yarn was going to be …

Luckily, I had the cowl (partly knitted picture above) that I had finished and found a (glaring) mistake as I was blocking it. The yarn was bulky and just what I needed for this pattern. And since I’ll never WEAR a bulky cowl in Florida, and I WILL wear slippers in Maine, what better use to put the yarn to?

Starting Non-Felted Slippers by Yuko Nakamura

Starting Non-Felted Slippers by Yuko Nakamura

This pattern, Non-Felted Slippers by Yuko Nakamura, caught my eye somewhere (perhaps on Ravelry). I thought the slippers looked comfy and I liked the idea that they didn’t need to be felted. When I found out it was with bulky yarn, so much the better because they’ll also be a quick knit!

My gauge was 8 sts = 2 inches and what the pattern said was 13 sts = 10cm. So, I had a few more stitches than the pattern called for. But I thought that would be OK since I have bigger than “medium” size feet. Unfortunately, I was “off” again … I would not make a good banker … and the first pair of slippers would stretch to fit me but they were stretched too far. So that pair will go to my little mentee who has a birthday coming up quickly. And on the second pair, I decided to add a few more stitches (a little more than an inch worth) to make the second pair fit me a bit better.

Sole: I cast on 56 stitches (using a US 9 16″ circular needle as called for in the pattern.) I knit the first row and the the second row I split up as follows: K35, P11, K35. I followed the directions and simply added a couple of stitches to each of the designer’s number. At the end of for 12, I had 81 stitches. Since I was using a single color of yarn, I didn’t cut my yarn and kept on knitting.

Instep: Starting on my 81 stitches, I knit the first row and then start my toe decreases. So, row 2 will be: P35, PM, P11, PM, P35. The decreasing begins with row 3 (you’ll be decreasing 8 stitches every other row and purling all of the even rows). Row 3: K28, SSK twice, K3tog, K11, sl1, K2tog, psso, K2tog twice, K28. Again, I followed the designer’s steps with a couple of stitches added in each section and when I got to row 28: P27, P2tog, P15, I was ready to be on Easy Street (and I was!) with the two rows of knitting all stitches and a bind off knit wise.

IMG_1619IMG_1621I seamed these babies up and they are ready to wear (for the first time) tomorrow morning. I can hardly wait.

Now, back to my brother’s birthday socks – his birthday was only five or six weeks ago! 😉

Gone knitting.

Casting On!

I’m casting on another new project. I probably shouldn’t be doing it, but I am. So there! 🙂

I saw a wonderful cowl pattern on the internet and just HAD to know what it was. Wouldn’t you know it was a Purl Soho/Purl Bee pattern (I’ve never seen a project that I didn’t like from that site!) called the Fluted Cowl (FREE pattern! Click here.)

It calls for 300 yards of a bulky weight wool. So, into my (beautifully organized) stash I went to see if I had what I needed and, sure enough, there it was. Sitting there looking back at me. Begging me to take it out of the bin and knit with it after all these years. Well, not really, but it sounds good doesn’t it?

Years and years ago I bought Some Jo Sharp Silkroad Ultra in a colorway called “Seafoam”. Five skeins of it. Why five? Because there were only five left and I really liked the color and the hand of the yarn. It was also at least 50% off because the shop was closing.

I’ve made an executive decision to use a US #13 needle because I don’t have the size that the pattern asks for. And since it’s a cowl not a sweater, the gauge isn’t as much a strict rule as a guideline. The cowl will be a bit smaller than the one in the pattern but that’s ok.

First cast on effort (yes, first means that I have had more than one!) was using a long tail cast on. I usually use this method and generally it works if I plan for approximately an inch of yarn per stitch. So, since the pattern asks for 196 stitches, I gave it three generous “wing spans” and then some figuring that my wing span is about 5.5 feet (I counted 60 stitches). Wrong. I got 169 stitches on my needles.

So, on round two, I decided to do a more “sure thing” cast on and used the knitted cast on. If you’ve never done it, it’s really simple.

Start with a slip knot on your left hand needle. Knit into the stitch (just like normal knitting) on the left-hand needle knit-wise.

IMG_0946

Insert the right-hand needle knit-wise

Now you can go ahead and wrap the yarn around the back needle and pull it through the “old” stitch. (Good grief, my hands and fingernails look awful! That’s what I get for trying a gel manicure with no intentions to continue to have them done!)

IMG_0949

Wrap the yarn around the needle and pull through to create the new stitch

Pull the stitch through the old stitch and you have one new stitch on your right-hand needle.

IMG_0952

Here’s your new stitch! You’re almost there!

Now, slip the new stitch from the right- to the left-hand needle and tighten the stitch down. Important note: when you’re slipping the stitch to the left-hand needle, twist your right-hand needle a quarter turn clockwise … make sure your two needle points are facing the same direction and then you’ll be passing the stitch the right way. Don’t just pass the stitch from right to left with the needles pointing opposite ways. I know it’s a bit confusing, but if you try it, you’ll see what I mean!

IMG_0953

Now just slip the new stitch back onto the left-hand needle and tighten it up.

Knitted Cast On

Voila! You’ve added one stitch. Now insert your right-hand needle into the new stitch on the left-hand needle knit-wise … and off you go!

You’ve cast on one new stitch. Now just start over again from the first step and repeat for as many stitches as you need for your project.

This way, you’re adding stitches with your working yarn rather than using the tail for your new stitches. This way you won’t get to 169 stitches and have three inches of yarn left for a tail (and nearly 30 stitches short of what is required!)

A new cast on method for you. I now need to go cast on another 190 stitches!

Gone knitting!

Attention! Attention! Knitting Queen (Bee)

I’ve learned that I need to pay attention when I knit.

Any distractions can cause me to knit beyond a decrease, or knit where I should purl … you get the idea! And knitting with a cocktail in hand is a definite NO! Knitting group projects must be free of decreases or any counting of stitches because I never cease to be amazed at how my chatting can make me forget the simplest of each!

That said, I’ve finished a few more projects and am pleased with my progress. But, once again, I brought more projects up to Maine to complete than I completed. I also am going home with more yarn than I came with.

Completed:

Baby sweater finished. Needs to be blocked.

Socks finished; Matching hat … maybe half way done!

Bird nest – finished and being lived in (see Facebook!)

My second attempt at the Gaia Shoulder hug … finished (when I was better able to pay attention!)

Gaia Shoulder Hug by Ann Carroll Gilmour – well, it’s her pattern. I knitted this one!

And I also finished the little cabled sweater in periwinkle blue. I haven’t photographed it yet … so watch here or my Facebook page!

Gone knitting!