With the impending arrival of Father’s Day tomorrow and Mother’s Day in the past, I have done a lot of reflecting on my own experiences with my parents. How they raised me, their only daughter, in the late 50’s and early 60’s while keeping a deep and very dark (to them) secret.
Shortly after my mother passed away in October of 2008, we found out that she had given up a baby boy for adoption in May/June 1956. Had she given birth to that baby boy, she’d have been ostracized. She’d have been labeled a strumpet, a hussy, a tramp. She would not have been allowed to marry my father if anyone had known. My father, however, would have been left to continue his life as before.
Being the next child born, and a girl, I can only imagine that I was a disappointment and it explains a lot about how she raised me. She was disconnected, aloof, often angry, not encouraging or loving. She was always heavy … keeping a layer of protection around her. Please don’t get me wrong, she fed me, did my laundry, drove me everywhere. I didn’t want for anything. Except her love. None of this was my fault, of course, and I didn’t know that I was getting treatment that was different from my younger brothers or my peers. But it was different and I was scarred by it. (Thank God for therapy!)
I say this today because I realized recently that many of my friends on Facebook seem to miss their parents and were deeply loved by them. Sadly, I don’t have that same feeling. I’d love to have them back to ask them questions about why they did what they did. Why they kept the secret after we were adults. Why they never told me they loved me or were proud of me. (They really didn’t unless it was after a fight and then it would be, “of course we love you” said in anger and frustration.) My brothers had a different experience. Psychologically, I’m certain that it was because I was the first born “after the adoption” and I wasn’t a boy.
I was encouraged to find a husband and marry … that’s why a girl goes to college. I was born to have babies, that was where I would find happiness and fulfillment. I was taught to iron and sew, to play the piano and guitar. I was given ballroom dancing lessons at Mary Jane Spencer’s. My peers were encouraged to pursue a career, told they could do anything that they set their mind to. I didn’t know that until I had children of my own … and had been in therapy for depression and a failing/failed marriage that lead to an ugly divorce.
 Today I am happier. At nearly 60 I am feeling comfortable in my own skin. I am grateful for the life I was given and I know that my parents never meant to cause me harm. They did their best. Sadly, it wasn’t good enough to give me wings to fly. I had to find those for myself.
Today, one of the things that makes me happy is yarn. Everything around yarn. I love people who use yarn in their creative endeavors. I love the animals who provide the fibers and the process that leads to the yarn being available to buy. I love feeling it and working it into a garment. I love the shop keepers and the customers. I am grateful for the shared wisdom of women and men who share my craft and the love of yarn. I love that I have found a wonderful man with whom to share my life. He loves me as I am even when I don’t.
Life hands you some bizarre twists and turns and I’ve learned that it’s all about what you do with them that makes you who you are. I am grateful for them all because I like where I am today. I wouldn’t be here without all those experiences. I’m strong and resilient and happy. I’ve started over many times and I’m sure I’ll start over again.
Speaking of starting over … I started something new yesterday.
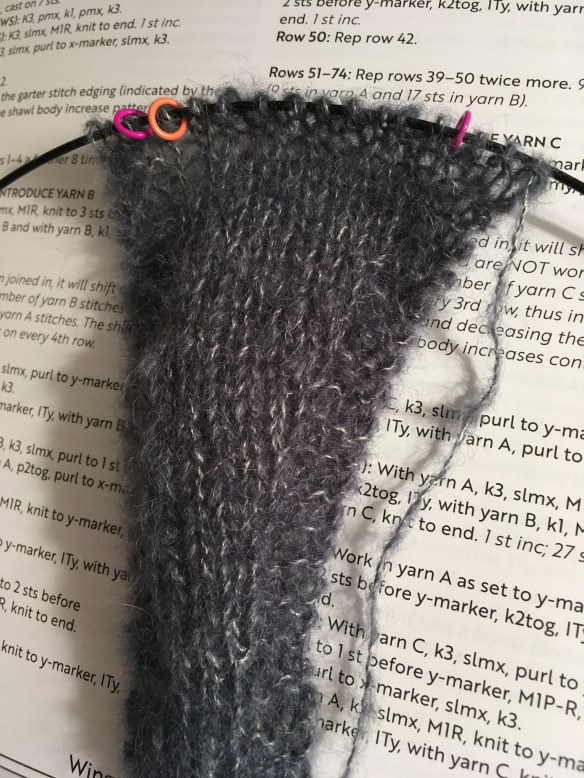 Born out of frustration with the fit of my nearly-done Malabrigo sweater, and in an effort to use some of my stashed yarn, I cast on the Brambling Shawl.
The Brambling Shawl by Bristol Ivy was one of the projects in A Year of Techniques. It’s a study in Intarsia – the use of two colors in the same row. The yarn used in the pattern (and that I bought) is Fyberspates’ Cumulus. It’s a lovely blend of baby Suri alpaca and Mulberry silk. The project calls for five colors (camel, slate, plum, sea green and silver) and is worked from tip to tip with increases and decreases to make a triangular shawl. I’ve just gotten started and have yet to add the second color, but I love being able to learn a technique with practice.
So, tomorrow I will celebrate my husband who is a great father. Patient, loving and kind. I will also celebrate the fathers in my life, my brothers, uncle, cousins, and my own dad who did his best. He did teach me to love pistachios!
Gone knitting!


 I joined a knitting challenge this year. It is called “A Year of Techniques” with Arnall-Culliford Knitwear and Mason-Dixon Knitting. Twelve months of technique-improving knitting projects. As a knitting teacher, it’s always fun to try something new. If I can master a new technique, I can share it with my students, too!


 My little dog, Lola, has had kennel cough and is now struggling with a goopy eye. Probably spring allergies. Both little dogs are heading to a new groomer on Wednesday and I’m sure that will help – we’re horribly over due for a hair cut! I’m working on finding a new hair dresser, too!
 Well, I’ve managed, with a lot of help from others, to get my blog back up and running. A HUGE thank you to Maureen C., my happiness engineer at WordPress.com, who was amazing! It’s really all to her credit that my blog is working again. Thanks, Maureen!