Queen Bee’s Striped iPad Envelope

Somebody loves me! I got an iPad for Christmas!

Somebody loves me! I got an iPad for Christmas! Isn’t she beautiful!?

I love my snazzy new iPad. When I’ve taken it to work in my purse or knitting bag, I have worried about scratching the silver back of the thing. So, as any reasonable person would do, I decided to whip up a little envelope to put it in.

Finished iPad Envelope

Finished iPad Envelope

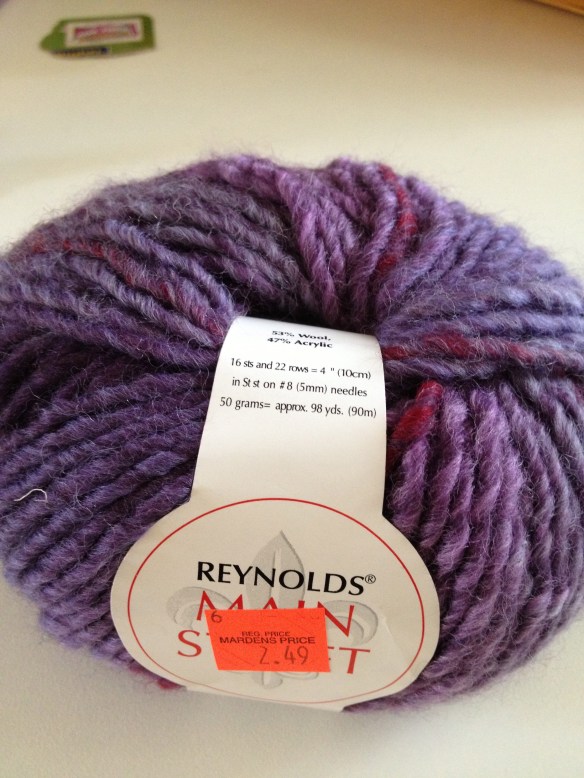
Into my Odds and Ends stash I went and found some Paton’s Classic Wool that I had in two shades of grey, and acid green and one cream that’s Plymouth Yarn, Galway Worsted. My iPad measures about 9.5 x 7.5 inches and I have the Apple screen cover … I knew I didn’t want to fight to put the device into the envelope every time so I wanted it to be a little bit bigger than that. (And don’t forget when you’re designing something, that you have to take into consideration the depth of the device.)

Left-overs from previous projects

Left-overs from previous projects … the starting point!

Looking at my yarn ball band (20 stitches=4 inches) and knowing that I knit pretty close to gauge, I cast on 80 stitches on my US 7 16-inch circular needles.

You can use as many or as few colors as you like. I used four colors. If my scraps were smaller, I’d have used more (and I may make one to give away!) Click on the link to download the pattern!

The Queen Bee’s iPad Envelope

I do have a few suggestions that will make your knitting simpler and may also make you happier with the process and the finishing!

1) You can carry the dark grey yarn up the piece because you’re going to use it every three rows. This saves you a bunch of ends to knit as you go or weave in. You can carry yarn when you have three or fewer rows before you’re going to use the color again. But there will be two ends for every other color change so …

2) Weave in your ends as you go. If, when you add a new yarn, you carry the ends of the yarns for a few stitches, you won’t have a bunch of ends to weave in. I’ve written about this in my blog click here! This makes knitting strips SO much more pleasant when you get to the end of your project. Promise!

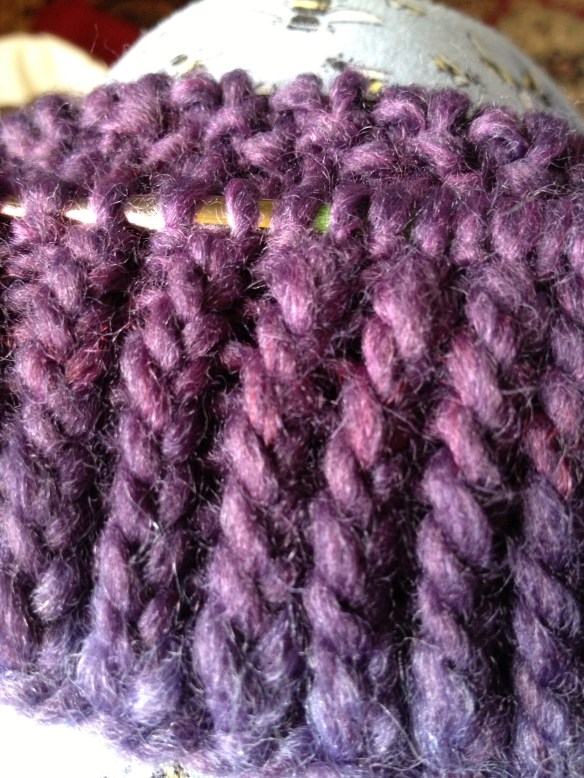
3) If you are a “type A” and you like your knitted projects to be “perfect”, you’re not going to be pleased with the way the piece looks unless you work a “jog-less join”. It’s an added task to remember when you’re changing colors, but if you think of knitting in the round as creating a spiral rather than row upon row of knitting, you’re never going to have everything line up perfectly when you’re knitting stripes. I’ve blogged about the “jog-less join” before so check it out before you start. I didn’t worry about it and this is what my edge looks like … could you live with this? If so, don’t worry about the jog-less join. If not, give it a shot!

Without Jog-less joins! Not perfect but I'm OK with that  (this time!)

Without Jog-less joins! Not perfect but I’m OK with that (this time!)

So, there you have it! Another knitting adventure with the Queen Bee.

I hope you enjoy this first free pattern! It’s widely known in the knitting community that free patterns are to be used for your own personal knitting and not for your commercial benefit … please don’t sell items made from this pattern. Contact me if you would like permission to use the pattern for anything other than personal use. Thanks.

Gone knitting!

Burning a hole in my … stash?

Like other knitters, I have a fairly extensive stash. No, not mustache, a yarn stash – that little bit of collected yarns from here and there that you have to buy because it’s so soft or pretty or pretty soft.

I bought this yarn last summer in Maine. I think what made it so appealing was the price … and maybe the color. Yes, I paid $2.49 a ball for it at Marden’s! It’s Main Street by Reynolds (color 6760, lot 8078, 53% wool, 47% acrylic, 50 grams/approx. 98 yards) – 16 sts and 22 rows = 4 inches in Stockinette stitch on US #8 needles.

IMG_1040


Yesterday, I was going through one of my stash bins and found this yarn (I have only two balls) and I was thinking about what I could make with it. It’s wool and acrylic. Soft. And it occurred to me that it would make a great hat. I’m envisioning a rolled brim cap that could be rolled down so that it would be slouchy. And then I was reminded of the Steven West post about pompoms that I saw on Facebook (I love making pompoms) and so I think it needs to have a pom pom at the top. Maybe even a crazy multi-colored pompom. That decision has not yet been made!

I measured my own (oversized) head and cast on 80 stitches that, with a ribbed hat, should accommodate larger and smaller heads. And I decided to make it a (sort of) twisted 1×1 rib (knit 1, purl 1) by knitting into the back of the knitted stitches. I love it when there is that little bit of twist in the knitted stitches. It’s just a little bit different and very pretty.

IMG_1037

See? Aren’t those lines of twisted knit stitches so pretty?! I can get so excited about the simplest little things! I think this is going to be one fun hat! Wait until you see the way the colors subtly shift from purple to nearly red! You can already see a couple of very subtle variations on purple. I’ll keep this pattern going for 9 inches or so. More pictures will be forthcoming at the hat “grows”!

Gone knitting!

Casting On!

I’m casting on another new project. I probably shouldn’t be doing it, but I am. So there! 🙂

I saw a wonderful cowl pattern on the internet and just HAD to know what it was. Wouldn’t you know it was a Purl Soho/Purl Bee pattern (I’ve never seen a project that I didn’t like from that site!) called the Fluted Cowl (FREE pattern! Click here.)

It calls for 300 yards of a bulky weight wool. So, into my (beautifully organized) stash I went to see if I had what I needed and, sure enough, there it was. Sitting there looking back at me. Begging me to take it out of the bin and knit with it after all these years. Well, not really, but it sounds good doesn’t it?

Years and years ago I bought Some Jo Sharp Silkroad Ultra in a colorway called “Seafoam”. Five skeins of it. Why five? Because there were only five left and I really liked the color and the hand of the yarn. It was also at least 50% off because the shop was closing.

I’ve made an executive decision to use a US #13 needle because I don’t have the size that the pattern asks for. And since it’s a cowl not a sweater, the gauge isn’t as much a strict rule as a guideline. The cowl will be a bit smaller than the one in the pattern but that’s ok.

First cast on effort (yes, first means that I have had more than one!) was using a long tail cast on. I usually use this method and generally it works if I plan for approximately an inch of yarn per stitch. So, since the pattern asks for 196 stitches, I gave it three generous “wing spans” and then some figuring that my wing span is about 5.5 feet (I counted 60 stitches). Wrong. I got 169 stitches on my needles.

So, on round two, I decided to do a more “sure thing” cast on and used the knitted cast on. If you’ve never done it, it’s really simple.

Start with a slip knot on your left hand needle. Knit into the stitch (just like normal knitting) on the left-hand needle knit-wise.

IMG_0946

Insert the right-hand needle knit-wise

Now you can go ahead and wrap the yarn around the back needle and pull it through the “old” stitch. (Good grief, my hands and fingernails look awful! That’s what I get for trying a gel manicure with no intentions to continue to have them done!)

IMG_0949

Wrap the yarn around the needle and pull through to create the new stitch

Pull the stitch through the old stitch and you have one new stitch on your right-hand needle.

IMG_0952

Here’s your new stitch! You’re almost there!

Now, slip the new stitch from the right- to the left-hand needle and tighten the stitch down. Important note: when you’re slipping the stitch to the left-hand needle, twist your right-hand needle a quarter turn clockwise … make sure your two needle points are facing the same direction and then you’ll be passing the stitch the right way. Don’t just pass the stitch from right to left with the needles pointing opposite ways. I know it’s a bit confusing, but if you try it, you’ll see what I mean!

IMG_0953

Now just slip the new stitch back onto the left-hand needle and tighten it up.

Knitted Cast On

Voila! You’ve added one stitch. Now insert your right-hand needle into the new stitch on the left-hand needle knit-wise … and off you go!

You’ve cast on one new stitch. Now just start over again from the first step and repeat for as many stitches as you need for your project.

This way, you’re adding stitches with your working yarn rather than using the tail for your new stitches. This way you won’t get to 169 stitches and have three inches of yarn left for a tail (and nearly 30 stitches short of what is required!)

A new cast on method for you. I now need to go cast on another 190 stitches!

Gone knitting!

Boot Candy Boot Cuffs

Boot Candy

I bought this pattern ages ago. My daughter asked for them. I’ve been so busy with knitting projects for customers that I am only now getting around to knitting them!

She asked for a neutral color. I’ve chosen to use some of my stashed yarn (bulky) is what the pattern asks for! I’m knitting with Rowan Scottish Tweed Chunky in a black tweedy yarn (color 023). It has flecks of bright red, blue and yellow in it. What I’ve learned about knitting with black yarn is that it’s really difficult to see the stitches and I have to keep close attention on what row I’m on. Even with the chunky wool, it’s difficult to see the stitches to count the rows!

Bee-utiful Cables! – Yarn is really black, not gray. I’m such a great photographer! 🙂

The pattern is Boot Candy Boot Cuffs by Sara Gresbach of Addiesma Designs. Simple to follow with a cable that is very attractive. I’m a bit concerned, despite the fact that I am on gauge, that these are going to be too big for my daughter but they fit my legs so only time (and postage) will tell! It’s just about the perfect time to send to her in Chicago where it’s getting a bit chilly at this time of year.

I, frankly, am a bit jealous about the cooler weather. It’s still hot and humid here in Orlando! I love my girl (well, all my kids) and I hope they fit and she loves them!

Gone knitting.


Yarn Transported … back to Florida

It’s difficult for me to believe that our time in Maine is over. That went by so quickly (once again!) I brought a big bag of yarn and patterns up to Maine and challenged myself to buy no yarn before I knitted up all that I carried up.

Well, I failed. I bought a bit of yarn again this summer and have carried it back to Florida with me. In fact, I spent the last part of the day today winding my new purchases from the earliest part of the summer. I did leave my yarn swift and ball winder in Florida and wasn’t able to ball the yarn … until today. And it’s so pretty!

Sea Colors Yarns in three colors for a sweater

Super Stash Addition … Marden’s
For under $40!

I also added my new Marden’s purchases to the stash list on my Ravelry page and have done some preliminary research into patterns for that yarn. I am thinking that I will have to be making hats and mittens and fingerless gloves for my shop. Some of the new yarns are really pretty … well, in fact, all of them are! That’s why I bought it!

Gone knitting


Scrappy Socks … and Low Socks

Finishing some projects and it feels oh, so very good!

I’ve been making a concerted effort to use my stashed yarn to clean out the closet and while I’ve been knitting away, the closet doesn’t seem to have a lot more space. Oh well, it will!

I’ve finished Cousin Lisa’s cowl and all it needs is some buttons and it can be wrapped and mailed. Now that it’s warm up north, she will be able to put it in moth balls and wait to wear it in the fall/winter! It turned out to be quite pretty.

I made a pair of socks … well, I started to make a pair of socks ages ago for my daughter’s friend Peter (who collects socks). Got all the way to the tip of the toe and realized that I wasn’t going to have enough yarn to finish two socks. Ok. What to do in this situation? I searched my LYS to see if I could match the yarn and do a toe in a complementary yarn. No such luck. SO, I just frogged them and put the yarn back in the stash and used another different yarn to complete the gift for Peter. Last week, I made a pair of “low” socks with the yarn and then started a pair of “Scrappy” socks to use up the many bits and pieces of sock yarn that I’ve collected (because I can’t throw it away!)

Anyway, I’m knitting … and that’s a good thing!