From my Northern Atelier

A dog on my lap, and knitting in my northern atelier … this is the best place I could be today. The sun is shining and there’s a gentle breeze blowing, the first laundry load of the season is hanging on the line. Life is good!

Thought I would catch you up with my knitting projects that are currently on my needles … they are growing and I have a bunch planned for this summer. I even brought a huge L.L. Bean bag full of yarn with patterns for most of them up with us from Florida. I had thought to knit all that up before buying any more yarn … well … it was a good try!

#1 – Log Cabin(-ish) Baby Blanket – I’ve never knitted one of these before and having seen a couple on the Internet, I decided to give it a shot. The yarn is an acrylic yarn because baby blankets have to be super washable and somewhat ordinary. But the blanket is coming along and almost finished. It’s pretty cute and I hope my customer likes it. After this, one more baby blanket will complete the order.

Log Cabin(-ish) Baby Blanket (Queen Bee Knits Original)

#2 – My tunic … which takes a back seat to “real work” is growing a bit since I last photographed it. I still love the color but the yarn is really splitty … maybe why it was wearing such a discounted price? Whatever … when it’s done, I think I’ll love it.

Dropps Tunic (Pattern #111-21) in Berroco Pure Pima (color 2243)

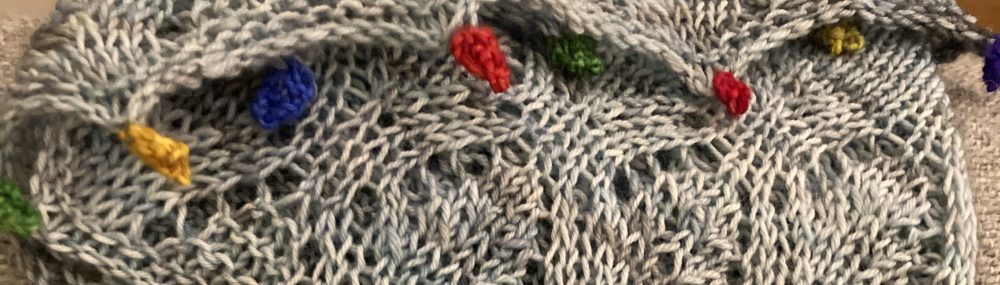
#3 – Fingerless gloves. These poor things have been sitting in their project bag minding their own business for way too long. I started them last fall and then put them aside because orders were flowing in and needed to be a priority (not that I’m complaining, that’s a great problem to have!) So, maybe now it’s time to pay some attention to them and get the second mitt knitted up, attach a couple of thumbs and send them to their intended recipient.

Vancouver Fog Fingerless Gloves in Cascade Yarns Lana Banbu (lot 93979 col 02)

#4 – One of the yarns that I bought in Gloucester is being knitted into a simple baby sweater and I’m totally in love with the yarn and the sweater (and the baby, too). The woman at Coveted Yarns told me that when you knit up the yarn it almost becomes a neutral and I’m starting to think she was right – despite the bright rainbow colors of the hand-dyed yarn. Hopefully, I’ll have enough to make a sweater and a hat or booties … but I am way ahead of the baby (who is not fully cooked yet!)

Knitting Pure & Simple Bulky Baby Pullover in Flat Rocks Yarns Whirlpool (#28 Grateful Threads)

#5 – Cooked Lobster Claw mittens – this my first original pattern that I will soon be adding to my shop on Ravelry. I have had two test knitters give the pattern a go and they’ve given me some wonderful feedback and a few photos of their projects. I’m happy to report that they’re really great looking and I think knitters will love it! I have one pair and one mitten knitted – so, unless I can sell single mittens, I had best make a matching one!

Oops! That's the real thing!

Ha! Well, now you know what I’m up to … I leave you with a photo of my laundry drying (yes, seriously!)

Gone Knitting!

New on the Needles

I bought some yummy cotton yarn to make myself a Drops knitted tunic that I saw somewhere online when I was wandering. The pattern is a free Ravelry download. The yarn was on sale (serious sale! I think it was $3.99 a skein!) at WEBS. It’s Berroco’s Pure Pima (color #2243 “Barely Blue”). I love that Jimmy Bean’s sent me a bag and matched the dye lots of the extra few skeins. It’s a pretty sky blue color with a bit of a gray undertone and I really like it. The pattern is found here!


Classic and simple patterning … I loved the yellow but my mother always said that when I wore yellow I looked green. I don’t want to look green!

Will be winding a skein and doing a swatch … because I know that if I don’t swatch, I will make the sweater in the wrong size! I guess I had best measure my chest, too … just in case! (Note to self – gauge is not for wussies!)

Also trying a pair of baby socks by Cat Bordhi – you can find out all about Cat at her website CatBordhi dot com. All of a sudden, I have an interest in knitting baby things … could be that there’s a new little niece or nephew in the oven!? Anyway, it’s the Baby Life Rings socks and they’re cuter than cute. Found some Cascade Yarns Fixation (also at WEBS) in a couple of colors … color #9030 (“denim”, if my memory serves) and color #9936 (“pacific”in really great ocean colors.) It looks like they’ll stay on the baby feet with three rings around the ankles. Always an issue for new parents, keeping feet on those wiggle pigs … I aim to please!

Already on the needles, my son’s socks. I’ll report on the yarn … because it’s not making this knitter happy. I’ve never had a ball of sock yarn “fight” with me quite so much! Promised by his graduation in June … who can believe that my baby will be graduating from college? And the baby blanket – reversible cables in a white acrylic yarn (to make it easier to wash over and over!)

Finished – a pair of lobster mittens (cooked, of course!) and two pairs of slipper socks. Also finished is a dishcloth … ours are getting pretty yucky! Photos will come soon … maybe tomorrow!

Grateful for fingers that work.

Gone knitting!

Lost & Found

I lost my 40″ circular needle wire (with some points on it) and was having difficulty knitting the booties that I wanted to start. wanting to make I’m not sure I’ve ever made booties before and wasn’t sure how the process went … consequently, my super long cord was essential to the project. I searched my entire Atelier to no avail. But yesterday after my Michael’s knitting demo, I searched for a third time and voila! I found the needle! An Easter miracle the day before Easter?

I got the first bootie cast on and finished now. It’s cute. I’ve used a pattern that I found on Ravelry but I’ve changed it up a bit – as a knitter has a tendency to do. So, one little bootie is finished. Three to go! (And I have to make a couple of pompoms for the matching hats, too.)

Haven’t moved much on the first of three (or more) baby blankets but those aren’t “due” until summer. And I have all the days of driving north … it’s almost time again!

It’s a beautiful day here in Florida. Great Easter egg-hunt weather and I’m sure kids all over are having a joyous day. I have such fond memories of the egg hunts at our house when the kids were little (and not so little) and one failed hunt when I decided to fill the kids’ baskets and hide the baskets. That never happened again (though the baskets were a success!)

Gone knitting!

Another Knitting Post? Reversible Cables Baby Blanket

Just to shock the hell out of you, here’s another post on knitting.

Cables are really not a difficult stitch. They may look intimidating but they’re really not difficult. There are only two stitches in knitting: knit and purl. (And dropped or added which are not official stitches and they’re not welcome in my knitting.)

Reversible Cables Pacific Heights Organic Baby Blanket

This blanket is a pattern that I found on Ravelry. I liked it for its simplicity and its cables! I love cables (must be my Irish heritage!) Blankets for babies should be washable and dry able because they’re going to be washed and dried a lot – and they’re meant to be used! This one is white … inconsistent with the mess that babies make but totally in line with their innocence. I love white baby blankets.

The yarn that I chose for this is “cheap-o” yarn from JoAnn Fabrics – Sensations Rainbow Classic. Described as “a classic brushed yarn, it’s a big ball and it should be enough for the whole blanket. (I hope!) it’s really soft and a little bit fuzzy like a mohair yarn (but acrylic). It’s a bulkier weight than the pattern called for so I’ve changed the number of stitches that I cast on and we’ll see how it goes. I also decided to use a larger needle and pulled out my Denises … in a size U.S. 11.

The pattern is called Pacific Heights Organic Baby Blanket created by Patty Thomas. It’s a simple pattern with Garter stitch with a lovely bunch of cables in the center. They are reversible cables which means that you can turn the blanket over and the cables look good on both sides. Very clever! And I really love that when I forgot the pattern when I went  into work the other day, that the repeat is simple enough that I could remember it! Yay!

I’m knitting this blanket for my sister Annie to give to a friend who is having a baby this summer. She’s actually asked for three blankets. Yikes! I’d best get busy …

Gone knitting!

Repairing Knitting

I’ve designed a baby blanket.

Long story short, I loved the blue color and the price of the yarn that I saw a while ago at JoAnn. I bought it and decided that rather than follow an existing pattern, I’d design one and add it to my Queen Bee Knits originals.

I’m on a seed stitch kick! I love seed stitch. I love the texture and I love the way the stitch feels when I am knitting. So, my blanket needed to have a seed stitch border. I also like “simple” for babies and didn’t want too many “holes” or lace in the blanket because baby fingers and toes get stuck in them. So, for the body of the blanket, I chose to do a simple stockinette stitch with a tiny lace row between the two.

I got the entire blanket finished and held it up … and there it was. A stitch right smack dab in the middle of the blanket had split and only part of the yarn formed the stitch and it looked like there was a gaping hole in the center of the blanket. UGH! (I think I may have said something I’d rather not type here!) So, because of the seed stitch and the lace, it wasn’t possible to drop one stitch and “zip” down to the mess. So, I “frogged” the seed stitch top border and the lace row and then zipped down to the mess and, with my trusty pink plastic crochet hook, stitched my way back up to the top. One row of lace and a few rows more of seed stitch border and it’ll be done again. This time without a hole in the middle.

I love that when I see a problem with knitting today that I can laugh at my mistakes and then solve the problem without a lot of drama. I love that there is relatively little drama in my life today – and when there is drama, it’s usually something that’s out of my control.

I’ll be publishing the pattern as a free pattern very soon. Just have to write it down!

Gone knitting (and finishing the blanket!) Photos coming soon!

From Soft Ball to Hard Crack

This photo is from 2010 ... not yesterday!

I got three loads of laundry done yesterday. It’s a bit different here. I always know we’re home in Belgrade when the first load of wash goes up on the line. It’s totally old fashioned or retro or green or whatever you want to call it, but it’s comforting and I love looking out to see the clean clothes flapping in the breeze (or gale) off the lake. Towels were drying in an hour yesterday despite no sun. Everything smells better when it’s been dried outside – the towels are only a bit rougher!

Yesterday was a productive day – may be because the sun actually peeked it’s head out. I made some really yummy toffee with cashews in it (and dark chocolate on it!) Making candy is really a cinch if you can resist touching it when it’s all in the pan. It wasn’t easy the first time I did it but this time, I didn’t mind at all. A good candy thermometer is just about all you need … watch the mercury rise from soft ball to hard crack and then turn off the heat! The candy is yum-ers! If you’d like to get the recipe for the Sea Salt Chocolate Cashew Toffee, visit this wonderful blog … just click HERE and you’ll be magically transported (you may have to search for the recipe, links aren’t working properly, sorry!)! Since I changed a couple of things, you’ll have to know my toffee doesn’t look exactly like this (this is pretty but too “fussy” for me in Maine). I didn’t use sea salt because I used salted cashews. I had no Karo Syrup so I substituted honey. Finally, I used one 13 oz. bag of dark chocolate chips which I spread on top of the hot but starting to set toffee rather than dipping it in melted chocolate. If you let it get warmed up sitting on top of the hardening candy, you can easily spread it around with a knife. Then watch it disappear!

I’m finishing several little side projects.

You’ve already seen the picture of the Senorita Lolita Sweater (the first design for Prima Dogma by Queen Bee Knits). In case you’ve missed it, I’m providing another shot of the first and second iterations here. The first one “placed” in a design contest using Koigu skein-ettes. I am over the top pleased with it! The second, while it is not nearly as special visually, it’s perhaps more special to me in that it means that the pattern is written down and I’m making progress!!!

Senorita Lolita (Copyright 2011 Prima Dogma by Queen Bee Knits


I have finished the fingerless mittens … these are a gift for a very special person. The pattern was great to follow and you can find it HEREI did change just a few little things. I didn’t use the smaller needles to cast on (because I like the wider, looser, mitten cuffs and these climb up your arm), I likewise, didn’t cast off two stitches for the thumb (thought it might be too tight). But I love the yarn I used and they’re really pretty – can’t wait to present them to my sweet girl recipient (ha! thought I’d tell you who they are for, didn’t you?! Ha!) I used some yarn that my daughter gave me for my birthday last summer from KnitPicks. Click HERE to be magically transported … I used the “Enchanted” colorway. Pretty!

I did finish the boulette blanket (and wrote down the free pattern which is posted here in my blog) and it was really warm. Ugly but warm for the baby when he was here visiting!

Ugly but Warm - "Boulette" blanket copyright 2011 Queen Bee Knits

I’m finishing all these little already-on-the-needles projects because I forgot all the patterns that I had intended to knit while we’re back East. They’re all down south. Go figure. Lucky we’ve got an event to attend and are flying back there for a long weekend so I can get the patterns and continue my knitting progress.

In the meantime, I have a cowl on the needles and the second design for the Prima Dogma line. Only “problem” is that with all our gray and rainy weather, this designer doesn’t feel a lot like designing.

I have a third pair of Birthday Party socks (thanks to my sister Kathy for the name!) on the needles, too. The first pair was a gift to Kathy for her birthday. The second pair is for sale in my Etsy shop. You can click HERE if you’d like to visit my shop. (Thank you, BTW, for supporting the talented artisans on Etsy.com … if you’ve never visited the site, it’s really quite amazing.)

So, I’m going to go out and brave the wind off the lake and the drizzly rain … just as soon as I have a cup of tea!

Gone knitting!


Free Knitting Pattern (and a little lesson)

You may (or may not) know that I had my French daughter, her husband and baby boy here for a visit. We’d not seen each other for more than ten years and it was a wonderful reunion. I am continually amazed by how you can reconnect with people with whom you’ve lost touch over the years and, if they’re also willing, can start over where you left off!

It was as if no time had passed. (Well, except for the fact that she found a husband and has a baby!) We laughed and cried, ate, talked, shopped … a trip to TJ Maxx, Walmart and Wendy’s were some highlights. At Wendy’s N taught “la boulette” to dip his fries in ketchup! To watch a really cute short video, click here: bouletteatw

Happy Boulette bathes in the kitchen sink!

When it came time to put them on the airplane, the tears were just like those shed in years past. I’d “forgotten” how much I love “my kids” and how much it hurts to say “good bye”. But at the same time, how wonderful is it that I have this little family that isn’t really mine but feels like it!? And I know we’ll be together again (hopefully, soon!)

Bet you thought that I’d forgotten the free knitting pattern, didn’t you?

Nope! Here it is! This is perhaps an ugly blanket because I had to use yarn that I had here and it was very last minute when I realized that a warm blanket was going to be needed – badly needed!

“La Boulette” Blanket (an Original Queen Bee Knits design)

Needles: size 15 circular needle (or larger or smaller to fit your yarn)

Yarn: Vanna’s Choice by Lion Brand 4 skeins, knitted with yarn doubled throughout. (Note: this is a very simple blanket, knitted on the bias. It will make a square blanket and could be knit with ANY yarn and needles appropriate to the yarn weight. Just knit as in the pattern directions until it’s the width that you want and then start the decreases! Easy!)

Blanket Directions:

Cast on 4 sts.
K2, YO, K to end
Turn and K2, YO, K to end of row
Repeat these two rows (which are actually identical) until the blanket is the width that you want.

Middle

K2, YO, K2tog, K to end of row
Turn
Repeat the last row three times more (total of four rows)

now it’s decrease time!

K2, YO, K2tog, knit to 4 sts before end of row, K2tog, K2
Turn
Repeat the last row until there are 4 sts on the needles (decreasing one stitch in each row)
Cast off 4 sts
Weave in all ends

And here’s the little lesson …

How do you count rows when you’re knitting all rows (otherwise known as stockinette stitch)?

Counting Rows for Stockinette Stitch

Each “pair” of bumps, one looks like it arches up like the letter “u” and the other arches down, is a row. In this photo, there are five bump pairs which means that you’ve knitted ten rows … hunh? you say? Yes, you’ve knitted ten rows because there is a corresponding bump on the back of the fabric, too. For each row you see on one side of the fabric, there is a bump on the other side of the fabric when you knit “back”. See what I mean?

Try knitting a few rows. Yup, take out your needles and a single strand of yarn (the sample above is a double strand of yarn). Cast on about 20 stitches and knit across them. Then knit back again. Now … look at what you have. You’ve knitted two rows and there are two “pairs of bumps” one on the right side and one on the wrong side.

If you don’t get it, comment on this post and I’ll illustrate further!

But for now, I’ve gone knitting!


The way to a man’s heart …

There are white caps on the lake this morning. When I look outside from the warmth of the wood stove, it looks (and sounds) a lot like the ocean. It’s a bit misty, too. Not a warm spring day in Belgrade!

We have a copy here of The Settlement Cook Book. Copyright 1944, the “Victory” (26th) edition published by the Settlement Publishing Company during WWII. Compiled by Mrs. Simon Kander. On the inside of the front cover is a lovely “autographed” photograph of Mrs. Simon Kander (if you click on the link above, there is a photo of the page!) who compiled the recipes and (not to worry) they’re “tested” recipes from “The Milwaukee Public School Kitchens, Girls Trades and Technical High School, Authoritative Dieticians and Experienced Housewives” … what a hoot!

As you may know, I love to bake. When I’m up here I like to use what we have around – much of which has been here for 50+ years. This cookbook is one of the things I love (and who’d ever have thought that it’s a rare, collectible book!) The big mixing bowl, is another. Anyway, I digress … Chapter One is entitled, “Household Rules” and it tells you all you need to know about keeping house – literally. Including, how to light a “modern” gas range, set a table, and how to make soap. One of my favorite recipes, though, is a recipe for “Scotch Scones” which I’ve used as the base of my recipe below and have adapted over the years according to what I’ve been eating. Since I’m now eating gluten-free, I’ll give you the basic scone recipe and then gluten-free!

Maine Blueberry “Scotch” Scones (best served warm with a cup of coffee or tea on a cold May day, inside by the wood stove when Lake Messalonskee looks like the ocean!)

2 cups bread flour (I use unbleached all-purpose flour)
4 teaspoons baking powder
2 Tablespoons sugar
1/4 teaspoon salt
4 Tablespoons butter, cold!, cut into small cubes
2 eggs, well beaten
1/3 cup buttermilk or cream
1 cup Maine blueberries (frozen or fresh)


Wash your hands now and take off your rings … this gets messy!


Preheat oven to 350°.


Mix together flour, baking powder, sugar and salt. Add butter and with your hands, mix butter into flour mixture until it is all blended in by pinching it between your thumb and fingers. Flour will look like larger grains and no lumps of butter will remain. Add eggs and buttermilk and mix until just combined. Fold in blueberries. Toss dough onto a floured surface and pat or roll to a square about 3/4 inch thick. Cut into triangles about 2 inches across. (This time, though I patted mine into a circle 3/4 inches thick and cut it into large wedges.) Transfer to greased cookie sheet, brush with egg white, and sprinkle with your choice of brown sugar and cinnamon, organic raw cane sugar, cinnamon sugar, etc. (My traditional sprinkle is with Turbinado sugar but today I used brown sugar and cinnamon.)


Bake for approximately 15 minutes.


For the gluten-free version, substitute Bob’s Red Mill gluten-free baking mix for the flour and add 3/4 teaspoon of xantham gum but the rest of the recipe is the same.
 

Now, for a cup of tea and a bit of knitting … new on the needles this morning, the Queen Bee’s Tweed Boulette Blanket. My French daughter and her family are coming to visit after waaaayyy too many years and I’m worried that the baby, la boulette, will be cold. So, what does a good “grand-mere” do? … She knits one!

Off I go to knit and snack!