Unknown's avatar

About Queen Bee Knits

Living in Maine, knitting, baking and loving my family. Please be kind!

Another Adventure Begins

For Sale!

For Sale!

Our house goes on the market tomorrow. We are following our hearts and moving to Maine.

It’s going to be an adventure for sure … since the existing house, in N’s family forever, is a 100 year old wooden structure not fit for year-round living. So, we’ll be salvaging wood floors, walls, old hand-blown windows, cabinets and doors to be put back into our new home. It’s bitter sweet tearing down a beloved structure but we’re trying to replicate the original house as much as possible … and making it modern so we can have water in the winter and we’ll be warm. And the house won’t be tipping into the lake!

We have the permissions from the town to build. The only other permit that has to be pulled will be with the environmental agency that protects our lake. Our design has been designed. Our builder has been chosen. We are ready to move all of our Florida stuff into a  moving truck/storage facility for a few months so we can build the new house.

So, the adventure officially begins tomorrow.

We’ve de-cluttered. We’ve de-personalized. We’ve cleaned and dusted. This evening we’ll bury Saint Joseph and ask him to help our home sell so we can start a new life in Maine in our new home. Maybe he’ll help us to sell the remaining furniture that we would rather not move, too!

It’s been nice living in Florida and we’re ready to start our new story. We’ll be blogging about it, of course! Not sure what the new blog will be called but we’re getting there! Now I need to find a job and start packing my yarn! That will be going in the car with my dogs and me! (Of course!)

Looking forward to this view .. all year long!

Looking forward to this view .. all year long!

Gone knitting!

K1FB Increasing Without Tears …or those pesky little “purl bumps”

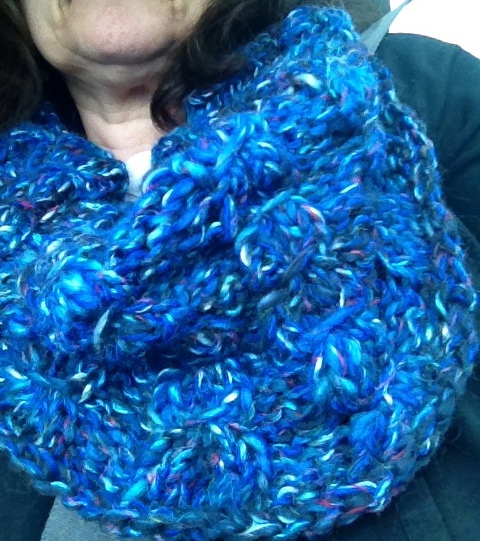
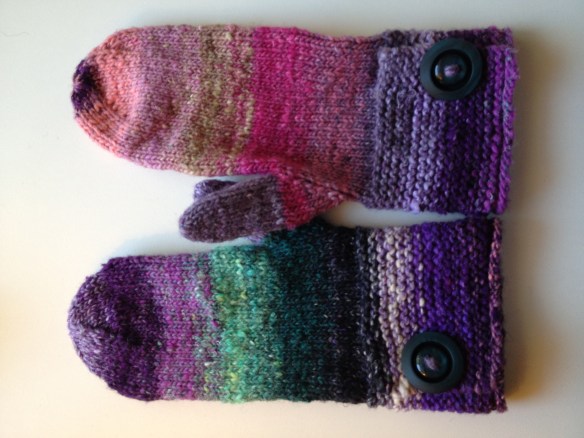
This morning I happened across a video for adding a stitch in your knitting without that funny little purl bumpy thing that happens when you knit one into the front and back of the stitch (K1FB). I have gone back to try to find the video but I can’t find it. So, in my own inimitable fashion, I’m going to attempt to show you, dear patient readers, with words and photographs what the video said.

There are many increases to use when you’re knitting. The “quickest and easiest” is K1FB or knit one into the front and back of a stitch. You can use this increase when you see “M1” in a pattern but I’d recommend that you use this as a generic increase rather than a M1 (make one).

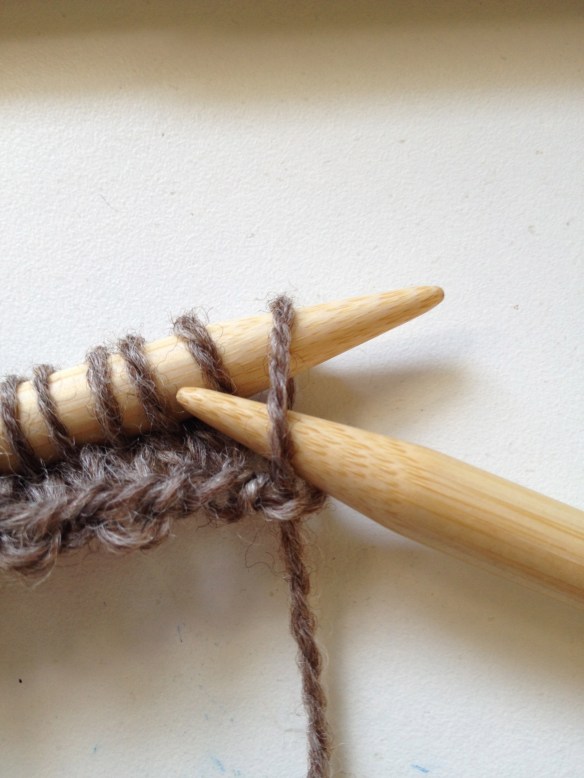
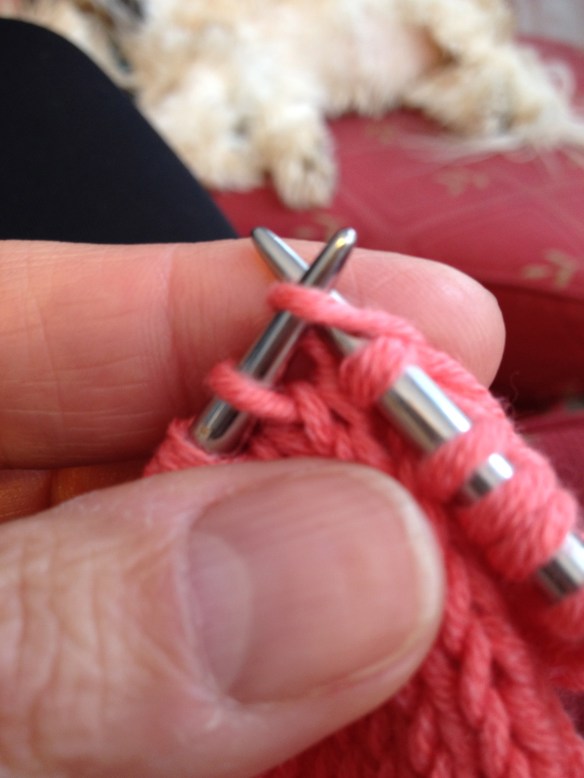
When you get to the place where you need to increase, you are going to knit into the front of the stitch (which I’ve already done in the photo below) and then, without dropping the stitch off the left-hand needle, you’re going to knit into the back of the stitch. The photo below shows the stitch that I am adding by knitting into the back … I’m ready to wrap and then slip the stitch off the left-hand needle.

I've knitted two stitches and am knitting into the front and back of the third stitch. I've already knitted into the front and now I'm knitting into the back.

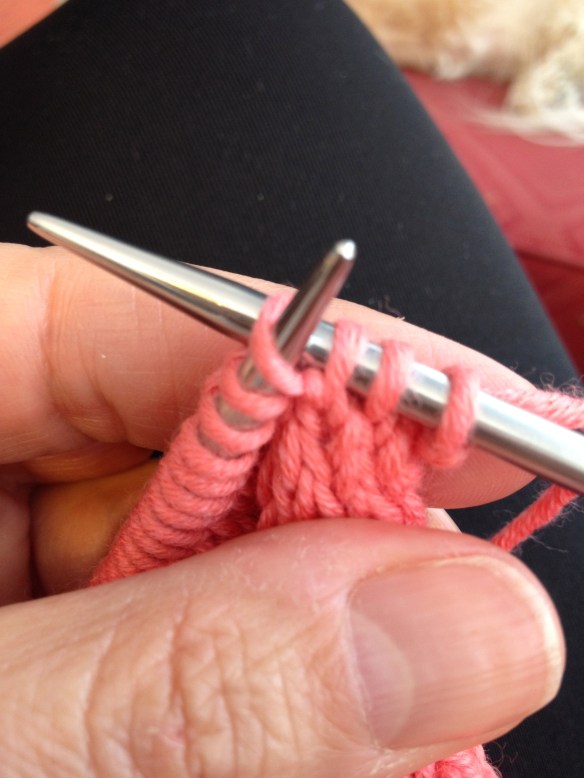
I’ve knitted two stitches and am knitting into the front and back of the third stitch. I’ve already knitted into the front and now I’m knitting into the back.

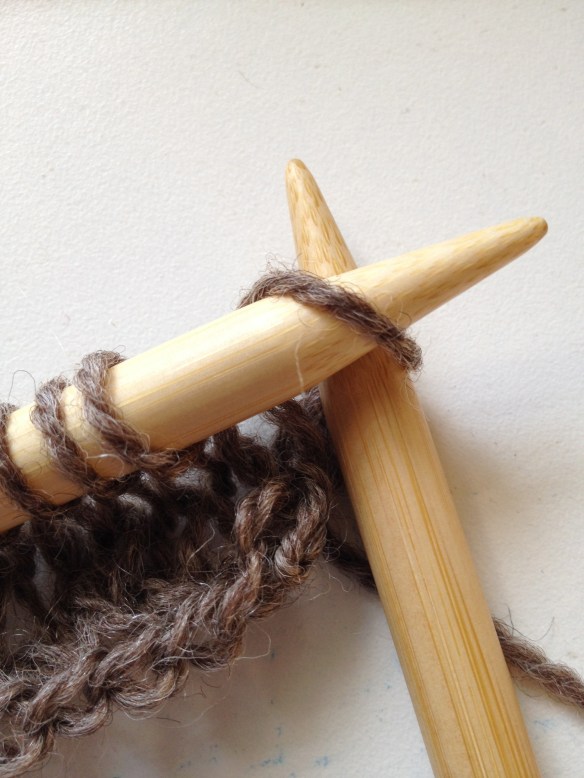
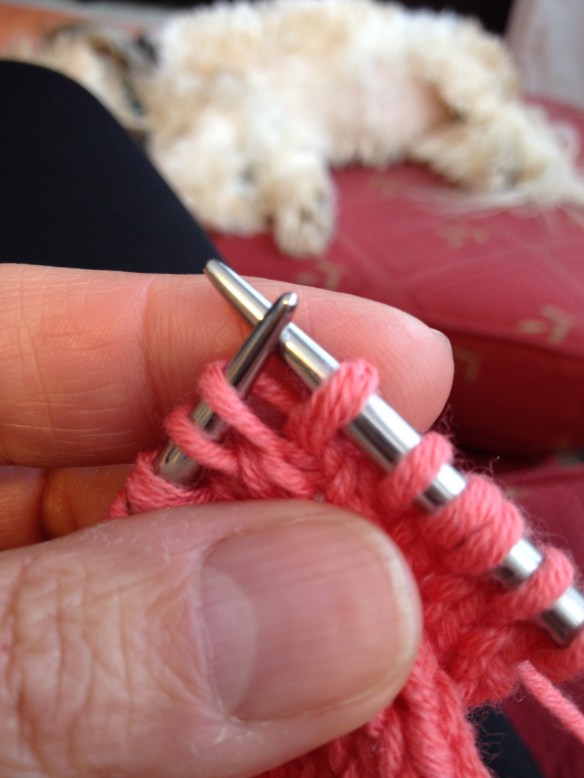
OK, so, I’ve wrapped the yarn around the working needle and slipped the stitch off the left-hand needle and this is what it looks like. There are my three “old” stitches and my “new” or “added’ or “increased” stitch. (Remember the first stitch is the the one to the right in the photo. The added stitch is the left-most stitch, the stitch just worked.)

Three stitches is now FOUR! But can you see the "purl bump" on the fourth stitch (the left-most)?

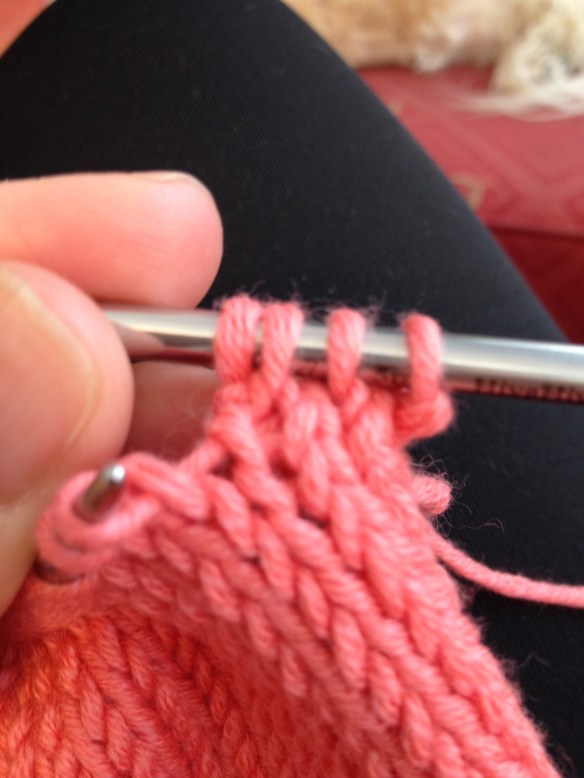
Three stitches is now FOUR! But can you see the “purl bump” on the fourth stitch (the left-most)?

So, we’ve accomplished our goal which was to increase one stitch. That stitch, however, isn’t invisible because of the little purl-like bump that is sitting in front of it. There’s nothing you can really do about it. And most times when you increase using the K1FB method, you’ll be increasing close to the side of a garment and those stitches will be swallowed up in a seam and will be virtually invisible after seaming.

BUT there is a way to make the stitches less visible and this is how you do it!

The first step is to knit into the front of the stitch but (again) don’t slip the stitch off the left-hand needle. (This is the exact same as the K1FB that I illustrated above.)

IMG_4271

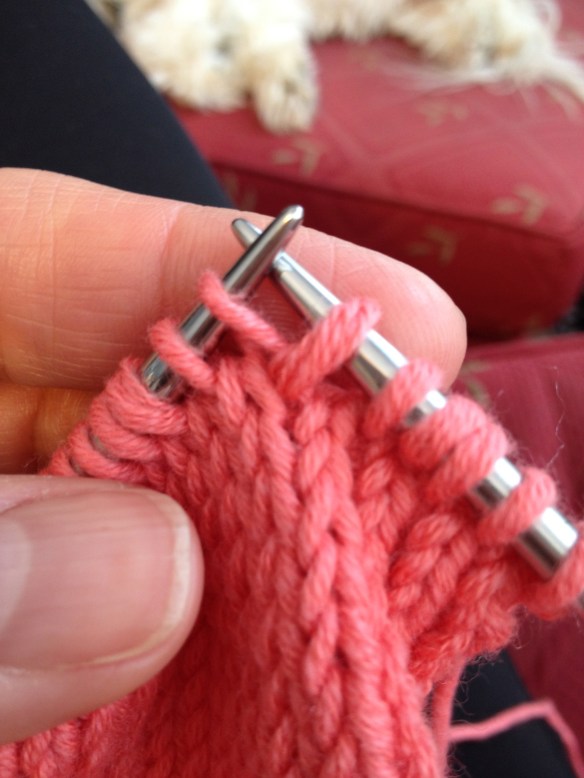
When you get to the stitch where you want to increase, knit into the front of the stitch.

The second half of the stitch needs to be reoriented so that the stitches don’t wrap around the front of the work. So, you’ll slip the next stitch knitwise by inserting the tip of the right needle from left to right (just like you were knitting the stitch) and slip the stitch from the left-hand to the right-hand needle.

IMG_4273

Next, insert your working (right-hand) needle into the front leg of the next stitch to be worked on the left-hand needle knitwise.

I know it sounds confusing, but I am at a disadvantage not being able to film myself in a video here! It forces me to find the right words to explain the process clearly and that’s good for both of us!

Next you’re going to slip the stitch back onto the left-hand needle to finish the process. Insert the tip of your left-hand needle purlwise into the stitch you just slipped to the right needle. Slip the stitch back to the left-hand needle.

IMG_4274

Slip the stitch purlwise back to the left-hand needle … you’re almost there!

All you’ve done is slipped the second part of the stitch increase from the left to the right knitwise (as if to knit) and then back from the right to the left purlwise (as if to purl). This has reoriented the legs of the stitch so that when you (next!) knit it, the stitch isn’t wrapped with yarn (and it doesn’t look as much like a purl bump.)

IMG_4275

This is how your reoriented stitch looks … and now you are going to knit it.

Go ahead, knit the stitch and slip it off the left-hand needle. There! You have increased one stitch.

If you look at the next photo now, you’ll see that there is a “normal” K1FB increase and a K1FB increase where I’ve changed the orientation of the increased stitch.

IMG_4276

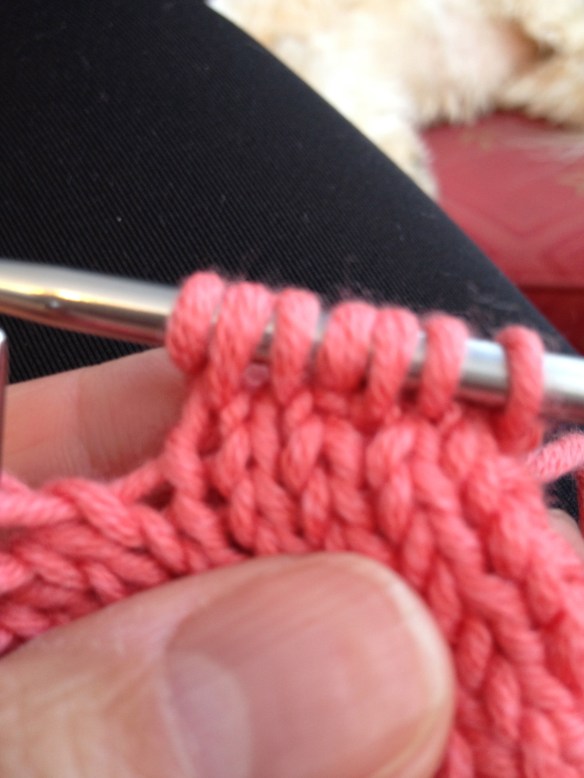
Reading from right to left: K2, K1FB (the old way where it looks as if the fourth stitch has a purl bump), K1, K1FB (the new way with changing the orientation of the increased stitch.)

See! No purl bump thingy! Now I’ll purl back across the stitches and you can see the fabric again …

IMG_4279

Again, reading from right to left you’ll see three knit stitches, one knit stitch with the “purl bump” below it and another two knit stitches and a new stitch from our reoriented K1FB.

There you have it! Two ways to increase in your knitting with K1FB (knit one front and back).

The first increase in stitch #3 (read from right to left) was the “old” knit one into the front and back of the third stitch which creates a fourth stitch with a “purl bump”. This is an excellent way to increase! Super quick and easy, just a bit visible in some circumstances.

The second increase in stitch #7 is done similarly but with a little twist of the second half of the increase where we reoriented or changed the orientation of the stitch before knitting it. This creates an added stitch without a wrap or “purl bump”. It’s pretty cool, isn’t it?

Learning to read your stitches is essential to your success as a knitter. I’m getting more skilled at it every time I take on a new project and teaching has helped me tremendously. This photograph, however, is such a clear one … and I get all excited.

When looking at this last photo, I can see the stitches added! Take a good look. The stitches in a each row are all lined up like a v on top of a v. Nice and neat! You can follow the stitches up in the center of the v. Where the increased stitches are added, it’s a little bit squeezed and the pretty symetry

VVVVV

VVVVV

VVVVV

When we increase a stitch, it squishes an extra stitch into the nice neat lines.

vvVvvVV

VVVVV

VVVVV

It’s a good attempt to illustrate with my limited illustration skills. I think. 🙂

Now that you’ve seen my excellent illustration, go back and have a look at the last photograph (I’ve added it below for you). Start at a stitch on the needle and follow the “v” down the rows. See how they line up? And can you see where the increased stitch just kind of pops up out of nowhere? It doesn’t have a nicely stacked column of “v”s to sit on top of … it’s just out there. The first K1FB increase (with the “purl bump” below it) stands out a lot more than it’s “cousin” the second K1FB “with a twist” but similarly, it just kind of gets nestled in between two stitches … each of the stitches has its column of “v”s but the increased stitch is sitting out there without a column. Can you see it now? Isn’t it exciting? You’re reading your knitting!

IMG_4279

Read your knitting!!! Stitches are sitting in a column of “v”s; row sits squarely on the row below it … until you have an increased stitch!

There you have it! How to make a K1FB increase without having that wrapped stitch that looks like a purl bump. I am such a knitting geek!

What else do you want to learn about increases?

Gone knitting!


Knitting Rules – The Truth about Slipped Stitches

Mojo Jojo Cowl in Berroco Mojo

Mojo Jojo Cowl in Berroco Mojo

I just completed a quick-knit cowl with some lovely yarn Santa brought for me. The yarn, Berroco’s Mojo in a bee-utiful shade of blues (Color 8001/Dye lot 2078). With two stitches to an inch on size US15 needles, this super bulky yarn knits up really quickly … the cowl took maybe four hours of knitting (and I’m a slow knitter).

The pattern, Mojo Jojo, is a free Ravelry pattern. I wasn’t sure what I wanted to knit up with the two hanks that Santa brought me but when I searched Ravelry (and I am moving to Maine in a few months) I found the cowl pattern and decided that THIS was a good plan. The pattern uses what is called a “faux cable”. I’m not sure that I agree with that term as it looks more like a stretched stitch to me but if you really want to stand back a few feet and squint, I guess one might say it looks like a cable … or maybe not. Regardless, the cowl is very attractive and it was a quick and easy knit project that I completed in a few hours. I will get a lot of wear out of it in Maine next winter.

Mojo Jojo Cowl Close-up

Mojo Jojo Cowl Close-up …  faux cable?

The faux cable is created by slipping one stitch, knitting four stitches and then passing the slipped stitch over the four knitted stitches. When knitting this cowl, I followed my slipping stitches rule #2. I slipped the first stitch knitwise because I was going to use it again in the next row.

So, let’s talk about slipping stitches in knitting.

A lot of knitters struggle with how to slip stitches and what is the “right” way to slip a stitch. So, here are the rules of slipping stitches according to me (the Queen Bee!)

Rule 1. If the pattern doesn’t state how to slip the stitch, the default is to slip the stitch from the holding needle (usually the left-hand) to the working needle (usually the right-hand) purlwise. There is no twist to the stitch, it’s passed from one needle to the other. Insert your working needle (right) purlwise (from the right to the left) into the first stitch.

Slip purlwise

Slip purlwise

Rule 2. If you are going to use the slipped stitch again in the same row, then slip the stitch knitwise as in a SSK (slip slip knit) or PSSO (pass the slipped stitch over). This way the stitch is twisted as it is slipped from one needle to the other.

Slip Knitwise

Slip Knitwise

Rule 3. If the directions tell you to slip the stitch(es) knitwise, then follow the instructions.

There you go! So simple that I even complicated the process with adding rule number three which, technically, is an obvious rule and should not even be mentioned. However, I have learned that I should not ever assume so the obvious becomes rule number three.

Gone knitting!

1500 Miles and Cloudy … with a Chance of Enjoyment?

December 27, 2014 Belgrade, Maine

December 27, 2014
Belgrade, Maine

Thank God yesterday looked like this.

Today looks like this …

December 28, 2014 Belgrade, Maine

December 28, 2014
Belgrade, Maine

There is a trace of snow and the lake is only semi-frozen but it’s still my favorite place to be. We decided to eat out and to sleep in the bedroom since it’s not particularly cold this year. The baseboard electric antique heaters from the 50s are working enough to take the chill off the bedroom and the electric blanket was even too warm for N last night. We both turned it off after it warmed the sheets. Climbing into cold sheets in Maine in the winter when you live in Florida is sheer torture. The wood stove is keeping the house a toasty warm and we’ve managed to wash faces and brush teeth with water carried in and using a two-bucket method (one for fresh and one for dirty).

My least favorite part is this …

The dreaded outhouse … or "chick sales"

The dreaded outhouse … or “chick sales”

As a nod to my willingness to camp and use the outhouse for a couple of days, I got the sweetest gift at Christmas … a fleece toilet seat cover for the outhouse seat. While it may seem silly, it really does make it more bearable and it’s good to be home!

Gone knitting (or out to breakfast)!


Blue Beanie Beret (Knitted Beret)

I needed to do some selfish knitting between the Christmas gifts that I’ve been making this year. Mostly because I needed some mittens for our trip to the North this winter.

Lovely by Suann Wentworth

Lovely by Suann Wentworth

I dug some Noro Taiyo Aran yarn out of my stash. It was calling to me to be knitted up. But as my friend Beverly says, I gave the mouse a cookie and you know what happens when you feed the mouse? I needed a hat.

I remembered seeing one in this book (on my shelf. One of these days I will attempt to knit a tea cozy or two from the book … which is why I bought the book in the first place.)

IMG_4039

The hat in the book is called Blue Beanie Beret. Mine is anything but blue … more pink, purple, teal, purple, green, and did I mention purple? While purple is not necessarily my favorite color, I love the colors that are in Noro yarns and this one is no exception.  I do think I would like to make another hat in a plain or tweed yarn because it’ll be very different.

This was a simple knit on circular needles starting at the top of the hat and knitting to the brim. Because the yarn is bulky (heavy worsted, actually) it knits up very quickly and I had the hat completed in a couple of days. Easy peasy!

Top of the hat … lovely!

Top of the hat … lovely!

Construction starts at the top of the hat with eight stitches … Increasing to make the beret top and then decreasing to where it is knit plain and ending with a stretchy bind off. Loani Prior has designed a great hat that I am eager to wear!

The finishing touch was/is a little rose. It is the designer’s intent for you to knit it in a contrasting yarn. Mine is in the same yarn because I was lazy. (I’m honest.) I have a bit more of the yarn and it’s the teal part of the colorway which I think might be a nice (nicer?) contrast on the rather pink brim of the hat. I’m going to sew mine onto a pin so that I can wear the hat with or without the rose.

A rose is a rose ...

A rose is a rose …

I think my Lovely mittens and my (Anything but) Blue Beanie Beret are wonderful. Can’t wait to wear them at Christmas time when I’m up in New England!

Gone knitting!


I’m a Crochet Queen Bee!

That's What I'm Talking About!!!

That’s What I’m Talking About!!!

Those of you who are loyal readers (such as it is since I haven’t been posting very often … this thing called work really obliterates my time to knit and blog about it) know that I’ve been saying that I have to learn to crochet. Well, I think I have accomplished a few steps in that direction.

I have a dear knitting friend, Terri, who is an accomplished crocheter, a good knitter and she is the Queen of Nuno Felting. One evening at our Wild Rows gathering, I asked her to show me a Granny Square and she did. I practiced for a couple of days until it started to feel more natural. Now I have a collection of Granny Squares …. I had thought I would make an afghan but I think I will make a cover for my ottoman that lives in my atelier. Time will tell but the pile keeps growing.

Granny Squares

Granny Squares

Then, my knitting group decided to make a baby blanket for one of our members. Terri reminded me that since it was to be a 12 x 12 inch square, it was a good way to practice more. This time we were asked to keep our squares to blues and/or browns.

12 x 12 inch Granny Squ

12 x 12 inch Granny Square

And then I found this bag pattern somewhere in the blog-oshpere or on Facebook or Ravelry. The pattern is here. It’s not in American crochet terms, which, I have learned are different from English/European (?) crochet terms so beware. I marched right out to my local Joann Fabrics and buy some cheap-o yarn to give it a go. I’d never followed a crochet pattern before and I didn’t know what the stitches were called. I found a tutorial on YouTube and off I went. My first attempt is in the “use it another day” bin because it didn’t look right. The second attempt is pretty darned good … in my humble opinion!

IMG_3979

I can even make a flower!

IMG_3982

The bag … lying down.


I was very pleased with my little flowers! They were to hide the rather ugly join that I had to make to get the handles attached to the bag. I think next time I would make the handles part of the body of the bag and leave it at that. BUT I love the little flowers and am glad to know how to make them … and add a couple of leaves on a couple of the handles and this is what they look like! I think it will become a gift this Christmas … stay tuned!IMG_3983Another project in the finished pile and now I can use the yarn to make a sampler blanket (baby sized) and learn a few more crochet stitches. Yay!

Gone knitting!


Hat for Haley … a Chemo Princess

Princess Hat

Princess Hat

I had a message from a friend in Ohio requesting a chemo hat to be made for a friend’s three year old daughter who has cancer. As I’ve said before, maybe not here in the blog, the words cancer and child should never be seen in the same sentence.

When a special friend asks and because my three children are healthy, I agreed to put aside my personal knitting and make a gift for a little girl who faces some yucky days. I needed to know her name and her favorite color. I had some fun purple (Haley’s favorite color) yarn in my stash and I went over to Ravelry to look for patterns.

I was originally thinking about a striped hat that I’ve made before. It’s a great hat. I’ve made a couple of them to donate for fund-raisers or whatever. Although, this old girl forgot, it seems, to take any photographs of them. Oops!

Anyway, I was looking around and found a lot of cute hats … and then I found THE hat.

I knew it was perfect (and I had just put aside some sparkly gold specialty yarn that I have had for ages to see if someone in my knitting group wanted to use it.) So, I pulled out the gold yarn and my stashed purple Cascade 220 and I got started.

The hat is called “Princess Crown” and can be found, free, on Ravelry. It’s one of many adorable patterns in Allison Stewart-Guinee’s Fairytale Knits book. And it was just perfect. I knew it in my heart immediately. What little girl doesn’t love to wear a crown?

Purple is Haley's favorite color … and this is more like the actual color of her Princess Hat

Purple is Haley’s favorite color … and this is more like the actual color of her Princess Hat

The hat knitted up very easily and has just a touch of lacey-ness in the body of the hat which carries down the hat making it look as if it’s a real crown. The golden crown part is knit up separately on circular needles and then stitched together with the hat. Once together, the band is knit and it even has a pretty picot edge stitched right in.

Because the format on the Amazon site is supposed to be laid out as a book, it can be a little bit confusing to follow. Just beware! I did get lost at one point and had to frog and re-knit a couple of rows. If you can follow the format of the pattern, though, the pattern is clearly written and simple to knit. It looks like you’re an expert, too!

Wet blocking so the hat has some shape!

Wet blocking so the hat has some shape!

I have wet blocked the hat and used a large handful of plastic grocery bags as a form to have the purple “hat” part block out. I can’t wait for it to dry so I can get it into the mail! I hope Haley is going to love it and that it brings her smiles on the crummy days when she doesn’t feel well. There’s lots of love in that little hat and it’s all heading to Ohio and Haley!

Gone Knitting.

Working is Ruining my Knitting Time!

Child BandaidYou may or may not know that I am a “clinic assistant” at our local elementary school. I am the “school nurse” paid on a lower pay scale and not a real nurse. I love the job most of the time and I adore working with the little germy kids. It’s very fulfilling … part mom (boo-boo kisser and ice pack provider) and part therapist (talking to kids with headaches and sore tummies really works miracles) and part EMT … I’m trained in first aid, and AED/CPR. So, if any of the adults decide to keel over on us during the school day, it’s me who is on the front lines. I hope I never have to use my training.

Anyway, I digress …

I came home from my summer in Maine at the beginning of August with several projects in tow. I left several in Maine to come home with my better half when he drives home. I’ve finished quite a few and have been putting off a couple, too. (I seem to want to ignore the color work projects – fingerless mitt and lobster had.) Instead, I’ve started several little projects that have been really fun. One of those is these cute little pumpkins.

Pumpkins!

Pumpkins!

The pattern is a free pattern that I found because my new son-in-law wanted to know if I could make them a trio of pumpkins. Click here to be transported magically to the website with the pattern! What I love about this pattern is that it is very simple (and mindless) and good for watching TV knitting. You can use any weight of yarn and appropriate needles and get several sizes of pumpkins … I used a Wool Ease super bulky yarn for the biggest pumpkin. The smaller ones were knit with worsted weight wool (Patons Classic Wool). I like the i-cord stems, too … and had some fun making them all a little bit different.

I have since made one more large pumpkin for my clinic (the kids will love it!) and have started a trio for my Chicago daughter. I hope she doesn’t read my blog … that’ll ruin the surprise. Totally.

Gone knitting!

Travel (Jet Blue) Blues

I travel with two adorable and helpful dogs. They are both Registered Service Animals. I don’t want to go into a lot of personal details but they are my little helpers. All sorts of animals provide services to people with disabilities … visible and invisible … dogs, cats, rats, snakes, horses and others, too.

Yesterday, like every time I fly, I started by presenting my ID and documentation for my dogs. The good people at Jet Blue held me at the ticketing desk for at least 20-25 minutes. Questioning me and, at the end, telling me that I could take them both on the plane “this time” but that in the future I needed additional documentation. Jet Blue will allow me to have one dog per “affliction”. I’ve been traveling with the two dogs. both registered (I provided a doctor’s note and veterinary note to get them registered) in the same bag for eight years with no problems … until yesterday. Apparently Jet Blue holds sway over the ADA who says that I can travel with my documented Registered Service Dogs.

I was a wreck. Anxious that they would not let me fly home without paying for an additional seat for my “extra” dog to sit under. Or that they would refuse me the right to board the plane. Or that I would miss my flight because of their delays.

Fortunately, I will not have to fly again for awhile, and when I do fly again, it will probably be on good old Delta where, when I show my documentation, I am not delayed and discussed everywhere I go. If only these people at the gates were better trained to be compassionate, life would be so much less embarrassing.

Gone knitting!