Remembering Why I Love Cables

Sirdar Snuggly Double Knitting Patten #1516

Sirdar Snuggly Double Knitting Patten #1516

Perhaps it’s partly my Irish heritage (the part of my heritage that I feel most connected to) or maybe it has no relation at all but I love, love, love cables!

I have two projects on the needles right now that I am enjoying. One is a little cable-knit poncho for my niece in California (I’ll be knitting a matching one for her little sister, too) the other is an infinity scarf/cowl for my daughter. The poncho has a great cable pattern that I am loving. It’s a Sirdar pattern (#1516), using Sirdar Snuggly Double Knitting (DK) yarn and a size US3 and US6 knitting needle. I’m using my Knitter’s Pride interchangeable needles which have great points for this yarn. You can buy them here or here. I love mine!!!

I’m going to spend this post talking about why cables are so simple and look so difficult and show a few pictures so that, if you’re a newbie to knitting and are a little bit afraid of cables, you’ll jump right in … because they’re really so much easier than they appear to be! Be brave! Go for it! Give it a try! (Rah! Rah!)

What my cable pattern looks like~ complicated, right? Wrong!

What my cable pattern looks like~ complicated, right?  …Wrong!

It really does look complicated, doesn’t it? I promise you that it’s really not complicated at all. All you need to do is lift a couple of stitches off the left needle and then knit a couple of stitches and then knit the lifted/slipped stitches. Follow along with me, I’m going to show you what I mean in a step-by-step tutorial.

IMG_5445

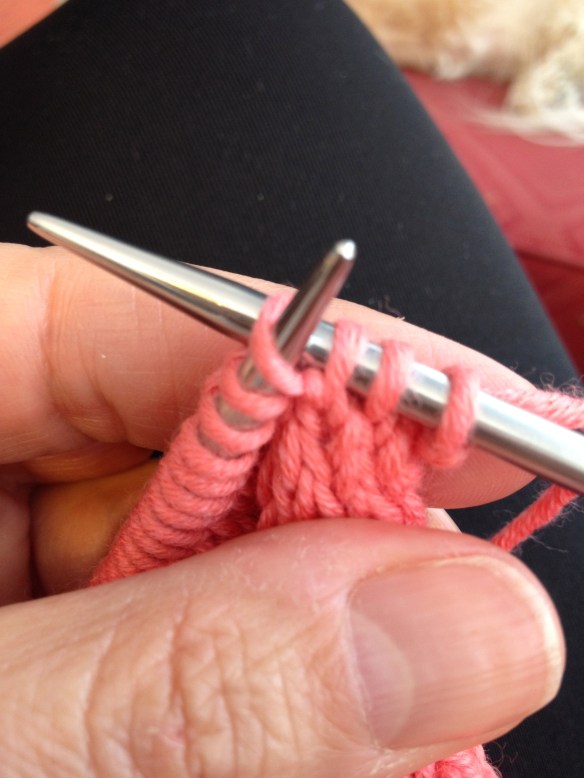
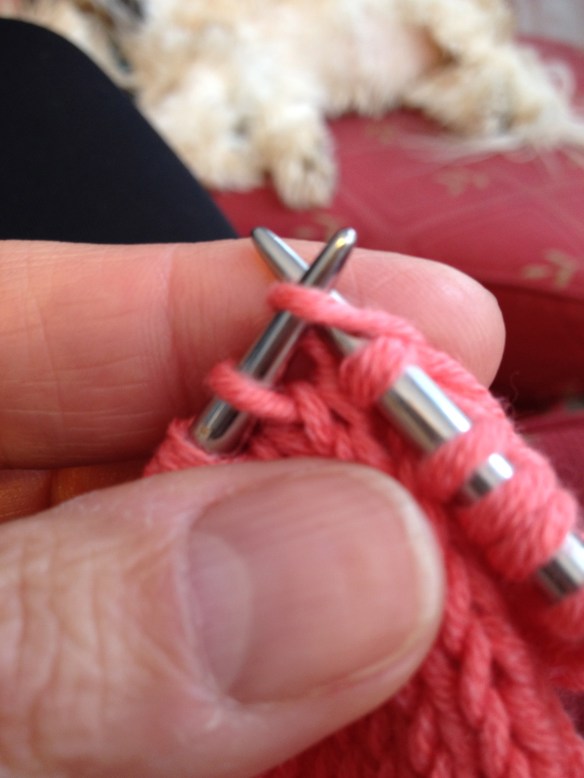
Left needle is holding stitches to be worked next … and we’re ready to make a cable!

I’ve knitted (or in this case, purled) over to where the stitches are that will be my cable (they are the knitted stitches, 8 of them between purl bumps).

If you examine the photo carefully, it’s just like it was sitting in your lap. The right hand needle is the one holding stitches that have already been worked. The left hand needle is the stitches that will be worked next. You can see the stitches several rows below where I am now working that have been cabled already. That’s a helpful hint. In  this pattern, the cables are neatly stacked up on top of each other.

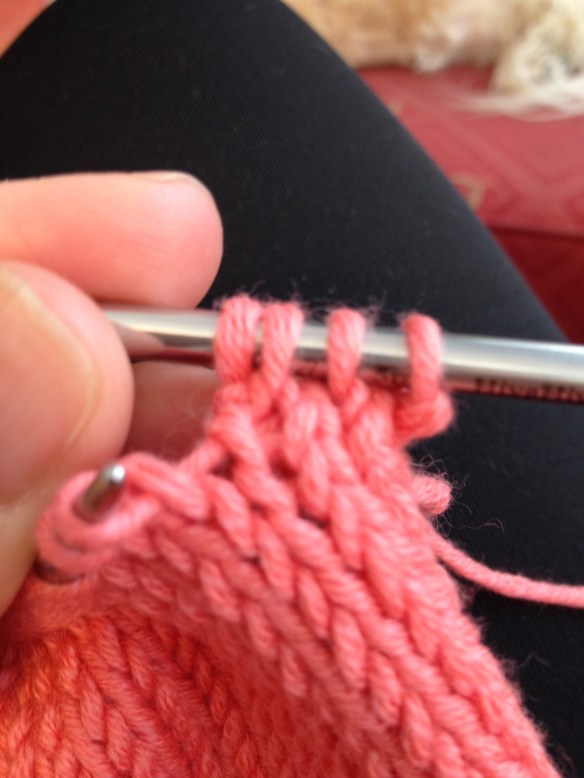
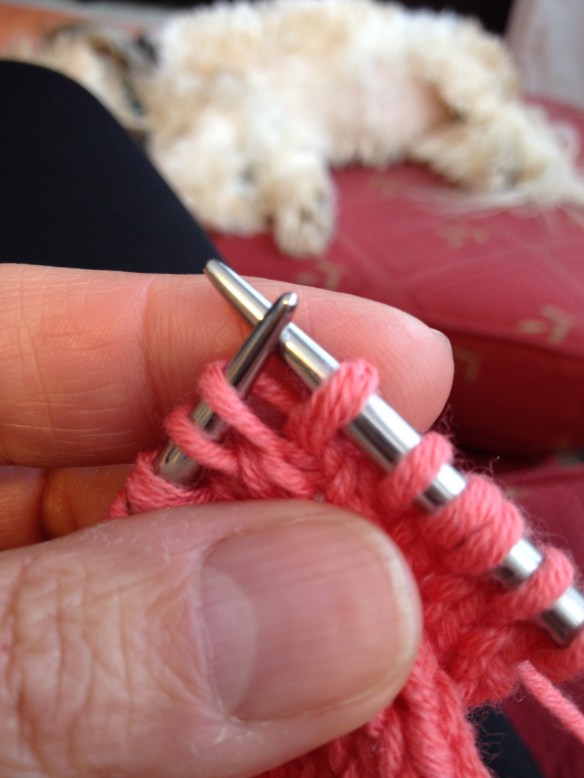
It is time to slip two stitches off the left-hand needle and hold them to the front of my work with my cable needle. I am using a cheap aluminum cable needle that I bought at JoAnn’s ages ago. I lose a lot of cable needles so cheap is good for me.

Slip two stitches from the left-hand needle to the cable needle without twisting or as if to purl.

To the left is a picture of the two stitches slipped onto the cable needle and being “held” in front of my work. If not careful, the cable needle will slip out of the stitches whether you hold it or not. But it’s not a crisis. The only time any damage comes to “dropped” stitches is when you pull. If you don’t pull your stitches, you can slip them right back onto the cable needle (or any other needle for that matter).

Now, I’m goinIMG_5450g to knit the next two stitches on the left-hand needle. And hopefully I will not drop the cable needle. And then I will knit the two stitches from the cable needle.

When that is done, I’m half way there.

I still have one more part of the bigger cable to do and that means slipping two stitches to the back of my work in the same manner that I slipped the stitches to the front. I will knit two stitches from the left hand needle and then knit the two stitches that are held on the cable needle in back of my work. Wait! I’m going to show you …

Just a note about cables – Cables are always either left-leaning or right-leaning. When you hold your cable stitches to the front the cable will be left-leaning (I remember that by thinking about left having the “f” in it which stands for front). And in the same vein, the right leaning cables will always be worked from stitches that are held to the back. (I haven’t got a mnemonic for that, but you have the one for the left-leaning so I hope you don’t need one for the right-leaning …. right?)

Knitted two from the working needle and two from the cable needle held in front. Now it's time to slip two more stitches and hold them to the back.

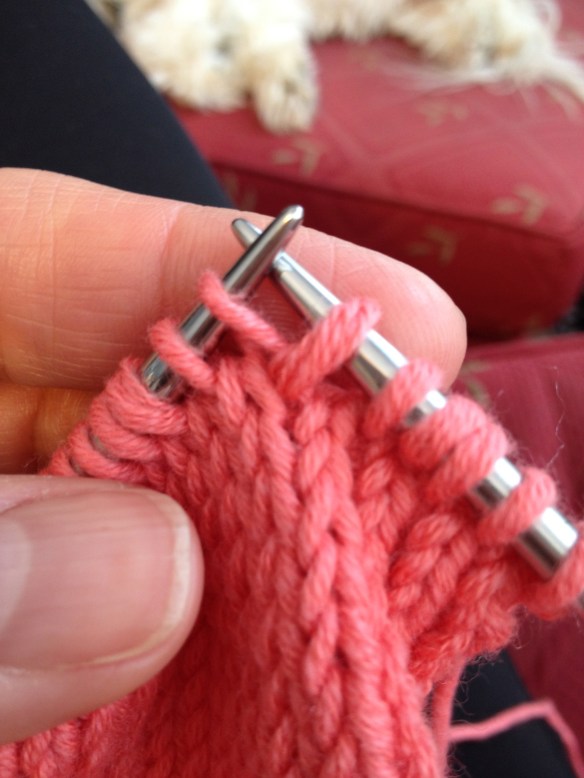
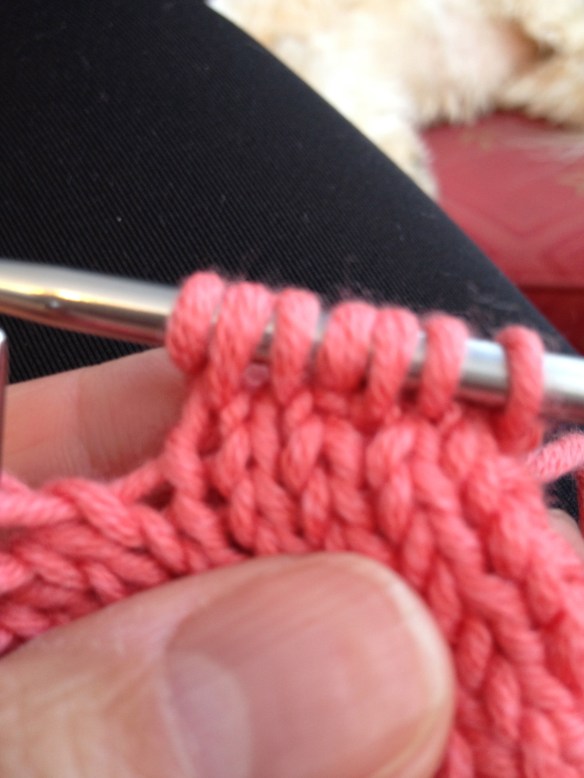
Knitted two from the working needle and two from the cable needle held in front. Now it’s time to slip two more stitches and hold them to the back.

Here is my work after having knitted the first four stitches (two from the needle and two from the cable needle held in front.)

Now it’s time to finish the cable.

We are going to slip two stitches from the left-hand needle to the cable needle and hold it to the back of our work. (This will be a right-leaning cable … can you see how the first part of this cable that we just finished is leaning to the left?)


IMG_5448

We have slipped two stitches onto the cable needle and they are being held to the back of our work …

Once the two stitches are on the cable needle and at the back of the work as in the photograph to the right, you can knit the next two stitches from left-hand needle … and then knit the two stitches from the cable needle.

Ta! Da!

You’ve just worked a cable! Woo! Hoo!


8-stitch cable with one side leaning right and one side leaning left

8-stitch cable with one side leaning right and one side leaning left

My two fingers are marking the eight stitches that we’ve just manipulated to make this “double” cable. The first side we knitted (on the right in this photo) leans to the left and the second side (on the left in this photo) leans to the right. Can you see this??? Under my fingers are two purl bumps … there are purl stitches on both sides of the cable. Purl stitches make the cable pop!

Simpler still, a 4-stitch cable

Simpler still, a 4-stitch cable that leans to the left and to the right


The other cable in this pattern is a simpler four-stitch cable.

The process is the same as far as the knitting goes. This cable leans to the left and then it leans to the right. Yup, you guessed it! When making up this cable, one time you’ll bring your cable needle with its two stitches to the front (left-leaning) and then the next time, you’ll bring it to the back (right-leaning).

Every cable pattern has a number of rows that it takes to make the cable happen consistently (and look just right!) This pattern just happens to have an eight-row repeat and the “difficult” rows are the first and fifth. These are the rows where I use the cable needle and cross or twist my stitches. The other six rows are super simple combinations of knit and purl stitches.

So now you’re ready to cast on some stitches and give cables a try, right? I hope this has helped to make you feel more comfortable with the idea of cables … cast on 22 stitches with any plain-colored light yarn and an appropriately-sized set of needles and give this a try! Here’s your “pattern”…

Cast on 22 stitches

Set up Row (wrong side of knitting): K2, P4, K3, P8, K3, P4, K2

Row 1 (right side of knitting): P2, C4B, P3, C4B, C4F, P3, C4B, P2

(remember: C4B means hold 2 slipped stitches to the back of work, knit 2 from working needle, knit 2 from cable needle and C4F means hold 2 slipped stitches to the front of work, knit 2 from working needle and then knit 2 from cable needle)

Row 2 (and all other even rows): K2, P4, K3, P8, K3, P4, K2

Row 3: P2, K4, P3, K8, P3, K4, K2

Row 5: K2, C4F, P3, C4F, C4B, P3, C4F, K2

Row 7: repeat row 3

Row 8: repeat row 2 (obviously)! This is the end of the 8-row repeat.

Give it a try and let me know how you do!

For now, I’ve gone knitting!


Three Cheers (for the Red, White and Blue)

Yesterday I spent a wonderful day learning something new.

The Class Sample … this is what my quilt will look like

The Class Sample … this is what my quilt will look like

I took a Flag Quilt class at the Cotton Cupboard in Bangor, Maine with a friend and we had a great time. It was my first ever quilt-making class and it was a positive experience for this  once-a-failure sewer!

I’ve made a few other quilts in my life. I made several Amish Tied Quilts back when my children were little. One for each of them and a few others interspersed. They are funny to look at today … my color choices “date” the quilts with the exception of the eldest daughter’s which is red, white and blue. My quilt already shows that I was into the black and yellow “bee colors”. I have all of them here in Maine and one day they’ll go to the kids homes … when they all have room for a quilt.

My Log Cabin Quilt …  finished and on our bed

My Log Cabin Quilt … finished and on our bed

The last two summers I worked on a Log Cabin quilt which I finished and had quilted at Quilt Divas in Rockland. I love it and it’s on our bed.

The quilt that I’m working on for this class is a throw quilt and it’s got several things going on. It’s straight piecing, some appliqué and some curved sewing. I’ve never sewn a curved seam in my life! I felt relatively adept at the cutting and straight sewing although one of my classmates gave me a couple of new tips that I really appreciated. The appliqué I had done once and that was alright. I have a lot more stars to appliqué so I’ll be a professional when they’re all done! The curved sewing will take me awhile … and is my biggest challenge.

Curved seams … I did pretty well. It just takes time

Curved seams … I did pretty well. It just takes time

When I was all done, I was sore and feeling successful … I had only screwed up one star square (and have to cut a few other pieces to be able to finish my quilt) because I hadn’t been warned about making sure the squares were not all facing the same way. Fortunately I have extra fabric!

I will keep plugging along at it and I will show the pictures of the final project …. whenever I get it done (and quilted.) Since it’s a throw, I’ll plan to quilt it myself.

Gone knitting!

Private Lessons

Sock Anatomy … I love teaching knitting!

Sock Anatomy … I love teaching knitting!


Yesterday I taught one of my knitting friends how to knit socks (on DPNs.) She was apprehensive at first and cast on with a death grip on the yarn. Row 1 was a bit easier but not natural yet.

“Keep at it, the muscle memory will come. I promise”, I coached.

And it did! By row two or three she got it! Yay!

I can’t wait to meet next week and teach her to turn a heel!

Gone knitting!

K1FB Increasing Without Tears …or those pesky little “purl bumps”

This morning I happened across a video for adding a stitch in your knitting without that funny little purl bumpy thing that happens when you knit one into the front and back of the stitch (K1FB). I have gone back to try to find the video but I can’t find it. So, in my own inimitable fashion, I’m going to attempt to show you, dear patient readers, with words and photographs what the video said.

There are many increases to use when you’re knitting. The “quickest and easiest” is K1FB or knit one into the front and back of a stitch. You can use this increase when you see “M1” in a pattern but I’d recommend that you use this as a generic increase rather than a M1 (make one).

When you get to the place where you need to increase, you are going to knit into the front of the stitch (which I’ve already done in the photo below) and then, without dropping the stitch off the left-hand needle, you’re going to knit into the back of the stitch. The photo below shows the stitch that I am adding by knitting into the back … I’m ready to wrap and then slip the stitch off the left-hand needle.

I've knitted two stitches and am knitting into the front and back of the third stitch. I've already knitted into the front and now I'm knitting into the back.

I’ve knitted two stitches and am knitting into the front and back of the third stitch. I’ve already knitted into the front and now I’m knitting into the back.

OK, so, I’ve wrapped the yarn around the working needle and slipped the stitch off the left-hand needle and this is what it looks like. There are my three “old” stitches and my “new” or “added’ or “increased” stitch. (Remember the first stitch is the the one to the right in the photo. The added stitch is the left-most stitch, the stitch just worked.)

Three stitches is now FOUR! But can you see the "purl bump" on the fourth stitch (the left-most)?

Three stitches is now FOUR! But can you see the “purl bump” on the fourth stitch (the left-most)?

So, we’ve accomplished our goal which was to increase one stitch. That stitch, however, isn’t invisible because of the little purl-like bump that is sitting in front of it. There’s nothing you can really do about it. And most times when you increase using the K1FB method, you’ll be increasing close to the side of a garment and those stitches will be swallowed up in a seam and will be virtually invisible after seaming.

BUT there is a way to make the stitches less visible and this is how you do it!

The first step is to knit into the front of the stitch but (again) don’t slip the stitch off the left-hand needle. (This is the exact same as the K1FB that I illustrated above.)

IMG_4271

When you get to the stitch where you want to increase, knit into the front of the stitch.

The second half of the stitch needs to be reoriented so that the stitches don’t wrap around the front of the work. So, you’ll slip the next stitch knitwise by inserting the tip of the right needle from left to right (just like you were knitting the stitch) and slip the stitch from the left-hand to the right-hand needle.

IMG_4273

Next, insert your working (right-hand) needle into the front leg of the next stitch to be worked on the left-hand needle knitwise.

I know it sounds confusing, but I am at a disadvantage not being able to film myself in a video here! It forces me to find the right words to explain the process clearly and that’s good for both of us!

Next you’re going to slip the stitch back onto the left-hand needle to finish the process. Insert the tip of your left-hand needle purlwise into the stitch you just slipped to the right needle. Slip the stitch back to the left-hand needle.

IMG_4274

Slip the stitch purlwise back to the left-hand needle … you’re almost there!

All you’ve done is slipped the second part of the stitch increase from the left to the right knitwise (as if to knit) and then back from the right to the left purlwise (as if to purl). This has reoriented the legs of the stitch so that when you (next!) knit it, the stitch isn’t wrapped with yarn (and it doesn’t look as much like a purl bump.)

IMG_4275

This is how your reoriented stitch looks … and now you are going to knit it.

Go ahead, knit the stitch and slip it off the left-hand needle. There! You have increased one stitch.

If you look at the next photo now, you’ll see that there is a “normal” K1FB increase and a K1FB increase where I’ve changed the orientation of the increased stitch.

IMG_4276

Reading from right to left: K2, K1FB (the old way where it looks as if the fourth stitch has a purl bump), K1, K1FB (the new way with changing the orientation of the increased stitch.)

See! No purl bump thingy! Now I’ll purl back across the stitches and you can see the fabric again …

IMG_4279

Again, reading from right to left you’ll see three knit stitches, one knit stitch with the “purl bump” below it and another two knit stitches and a new stitch from our reoriented K1FB.

There you have it! Two ways to increase in your knitting with K1FB (knit one front and back).

The first increase in stitch #3 (read from right to left) was the “old” knit one into the front and back of the third stitch which creates a fourth stitch with a “purl bump”. This is an excellent way to increase! Super quick and easy, just a bit visible in some circumstances.

The second increase in stitch #7 is done similarly but with a little twist of the second half of the increase where we reoriented or changed the orientation of the stitch before knitting it. This creates an added stitch without a wrap or “purl bump”. It’s pretty cool, isn’t it?

Learning to read your stitches is essential to your success as a knitter. I’m getting more skilled at it every time I take on a new project and teaching has helped me tremendously. This photograph, however, is such a clear one … and I get all excited.

When looking at this last photo, I can see the stitches added! Take a good look. The stitches in a each row are all lined up like a v on top of a v. Nice and neat! You can follow the stitches up in the center of the v. Where the increased stitches are added, it’s a little bit squeezed and the pretty symetry

VVVVV

VVVVV

VVVVV

When we increase a stitch, it squishes an extra stitch into the nice neat lines.

vvVvvVV

VVVVV

VVVVV

It’s a good attempt to illustrate with my limited illustration skills. I think. 🙂

Now that you’ve seen my excellent illustration, go back and have a look at the last photograph (I’ve added it below for you). Start at a stitch on the needle and follow the “v” down the rows. See how they line up? And can you see where the increased stitch just kind of pops up out of nowhere? It doesn’t have a nicely stacked column of “v”s to sit on top of … it’s just out there. The first K1FB increase (with the “purl bump” below it) stands out a lot more than it’s “cousin” the second K1FB “with a twist” but similarly, it just kind of gets nestled in between two stitches … each of the stitches has its column of “v”s but the increased stitch is sitting out there without a column. Can you see it now? Isn’t it exciting? You’re reading your knitting!

IMG_4279

Read your knitting!!! Stitches are sitting in a column of “v”s; row sits squarely on the row below it … until you have an increased stitch!

There you have it! How to make a K1FB increase without having that wrapped stitch that looks like a purl bump. I am such a knitting geek!

What else do you want to learn about increases?

Gone knitting!


I’m a Crochet Queen Bee!

That's What I'm Talking About!!!

That’s What I’m Talking About!!!

Those of you who are loyal readers (such as it is since I haven’t been posting very often … this thing called work really obliterates my time to knit and blog about it) know that I’ve been saying that I have to learn to crochet. Well, I think I have accomplished a few steps in that direction.

I have a dear knitting friend, Terri, who is an accomplished crocheter, a good knitter and she is the Queen of Nuno Felting. One evening at our Wild Rows gathering, I asked her to show me a Granny Square and she did. I practiced for a couple of days until it started to feel more natural. Now I have a collection of Granny Squares …. I had thought I would make an afghan but I think I will make a cover for my ottoman that lives in my atelier. Time will tell but the pile keeps growing.

Granny Squares

Granny Squares

Then, my knitting group decided to make a baby blanket for one of our members. Terri reminded me that since it was to be a 12 x 12 inch square, it was a good way to practice more. This time we were asked to keep our squares to blues and/or browns.

12 x 12 inch Granny Squ

12 x 12 inch Granny Square

And then I found this bag pattern somewhere in the blog-oshpere or on Facebook or Ravelry. The pattern is here. It’s not in American crochet terms, which, I have learned are different from English/European (?) crochet terms so beware. I marched right out to my local Joann Fabrics and buy some cheap-o yarn to give it a go. I’d never followed a crochet pattern before and I didn’t know what the stitches were called. I found a tutorial on YouTube and off I went. My first attempt is in the “use it another day” bin because it didn’t look right. The second attempt is pretty darned good … in my humble opinion!

IMG_3979

I can even make a flower!

IMG_3982

The bag … lying down.


I was very pleased with my little flowers! They were to hide the rather ugly join that I had to make to get the handles attached to the bag. I think next time I would make the handles part of the body of the bag and leave it at that. BUT I love the little flowers and am glad to know how to make them … and add a couple of leaves on a couple of the handles and this is what they look like! I think it will become a gift this Christmas … stay tuned!IMG_3983Another project in the finished pile and now I can use the yarn to make a sampler blanket (baby sized) and learn a few more crochet stitches. Yay!

Gone knitting!


Fannar by Shannon Okey (aka knitgrrl)

Yarn - Cascade 220  (Color #9401 Lot #0739

Yarn – Cascade 220 (Color #9401 Lot #0739

I am nearly done with my first test knitting “job”. It’s been a very rewarding experience, and beyond the knitting, I’ve been privileged to “meet” some wonderful and fun knitters. Enough so that I am hoping they’ll take me up on my offer to host a knitting retreat at our house in Maine next September (2015).

My pattern is called “Fannar” and will be in the new book, coming out soon, called “Frozen: Aurora Borealis Mittens.” (No, I didn’t get paid, since I know you’re all wondering!) When I received my yarn, “ordinary” Cascade 220 in a lovely ivory and grey tweed, I immediately felt some relief from my perceived design-envy. First lesson learned: You don’t have to use exotic (aka pricey) yarns when you design! Who knew!? I was so excited that I nearly tinkled! 🙂

The fabric - unfelted

The fabric – unfelted

The initial pattern that I was sent was a chart. Now, I’ve knitted from charts many times before but never for an entire pattern and it was intimidating for about ten minutes. Until I realized that I knew this! I know this! I had it covered and I could do it. And I cast on with a provisional cast on to leave some live stitches for the cuff.

I knitted up the largest size and after I’d reached the thumb crotch my gut was telling me that this puppy was absolutely over-the-top humongous! I sent a photo to Shannon and she, too, was amazed at its girth. So, I frogged the behemoth and we started from scratch. As Shannon was out of town, Andi stepped in and whipped up an entirely new mitten pattern. And I started knitting again … this time a more appropriate size, even knowing that it is going to be felted.

Thumb Gusset (part deux)

Thumb Gusset (part deux) – way more normal!

The second iteration of “Fannar” is much more normal and the knitting process is super quick. Since I got the one-color mitten, I think I got the easiest job in the book. It’s been super fun to follow the secret Facebook group and watch as other test knitters knit their patterns. And to learn about the comment threads via email, used to communicate. It makes me want to knit more color work. That may be my summer challenge.

I’m wrapping up the second mitten and will finish the second thumb today. Then my job will be over. I can’t wait to see the finished product – the mitten will be felted in Ohio and a cuff will be knitted on afterward (thus the special cast on). I think I am going to have to knit up a pair for myself and felt them and see how it turns out … just for sh#$s and giggles!

What an excellent experience!

Gone knitting.

Still Learning!

I may be creeping toward “old” but I am still learning every day. The lesson that I am learning right now is self-care. I’ve spent the majority of my life taking care of others; my children, my (now ex-) husband, my work, the kids at school, my dogs. You get the drift. I know that the old airplane adage is true. You have to put your own oxygen mask on before you help others… I’ve just never been very good at it. Today, my body has given me no choice. I have to stop and take care of myself.

I’ve taken myself to two urgent care offices in the last week and am not sure that I won’t be visiting my primary care physician before tomorrow ends. I have way more prescriptions than I’ve ever had on my kitchen counter. And I’m not all better in less than 24 hours. I just keep trying to remember to be patient. I’m really such a lucky girl to be as healthy as I am. Need I add the caveat, “at my age”?

Yup, they're all mine!

Yup, they’re all mine!

So, you ask, what are you doing to take care of yourself today? I am working hard to stay still. I’m working on my test knitting project. This is the first time I’ve done any test knitting and I’m excited and anxious about it. I know I know how to knit and have knitted for other people before. But I’ve never knitted a sample for a new book before. So, I’m learning to be more confident. It’s only a pair of mittens for heaven’s sake! So, that’s my big project today. To take one stitch at a time and get ‘er done! I know I can do it (and I’m excited to be offered the opportunity!) Every new knitting experience that I take on makes me grow as a knitter and as a person, too. I learn more about myself and gain confidence with each new attempt.

My pattern is called “Fannar” and it is being stitched up in Cascade 220 on my US #8 needles. I’ll share more as it is allowed. For now, this project is being kept in the project bag! 🙂

My Cooperative Press Test Knit Project … just starting!

My Cooperative Press Test Knit Project … just starting!

So, for today, I’m managing many more medicines than I am accustomed to and I’m working on a project that is challenging my knitting boundaries … and will expand them without a doubt! I’ve helped to fund an Annie Modesitt book, History on Two Needles Exploring Art History Through Modern Hand Knits and now I’m knitting samples for Shannon Okey’s new book, Frozen: Aurora Borealis Mittens, due out “soon”.

Gone knitting!

Throw Out the Lifeline!

There is an old hymn that shares the title for my post. I guess I’m older than I think I am because I remember singing it at a hymn sing as a young girl in Tenants Harbor, Maine. As soon as I typed my title, I had to search for the song (to make sure I wasn’t remembering “wrong”!) There it was. What a wonderful memory! (Click here for the link to YouTube.)

In knitting, a life line can be a project saver. I used one just this weekend when I was finishing my Jimmy Beans Wool Downton Abbey Mystery KAL … a lovely shawlette. I was really happy with the project and had a bit of yarn left over that I thought MIGHT be enough to have a third repeat of the lace edge. On Thursday night I expressed my concern to my knitting friends and Kelly suggested that I give it a try but use a life line (just in case)! What a wonderful suggestion.

Here’s what mine looked like when it was being blocked …

My Shawlette in Malabrigo Silky Merino color 856 Azules

My Shawlette in Malabrigo Silky Merino color 856 Azules

Never used a life line? Really!? Well, I have to confess that I hadn’t used one before. But it’s really quite simple. This is all it takes …

Life Line (pink) …

Life Line (pink) … Wow! I need a manicure! 🙂

All you have to do is get a different color bit of yarn. Since I was knitting a lace piece with several hundred stitches, I kept it really long so I didn’t drop stitches off the life line. That would be disastrous!

With your tapestry needle, thread the life line (pink) through every stitch.

With your tapestry needle, thread the life line (pink) through every stitch.

Thread your tapestry needle and  starting on one end of your work, run the life line through every stitch. (Note: do not run the life line through your markers as this will cause trouble when you go to knit! Run the life line under the markers.)

What you need to do before you start knitting again is make sure that the life line is “in the same place” and no wound around the needle. I made sure that my life line was beneath the needle sitting on the bottom of my last row of stitches. Once you start knitting, just make sure that you don’t knit your life line in with your stitches.

I was super lucky this time and I did have enough yarn. I may have been able to knit ONE more row … but I was concerned that I wasn’t going to have enough for the one knit row and then a bind off row. So, my last row was a knit and bind off at the same time.

I’m really pleased with the end result … I can’t wait to wear it!

Gone knitting!

Learning Something New

This week I started a new job with a day of training and then “bam!” I hit the ground running. I am the Clinic Assistant at my local elementary school … what used to be the school nurse but public school budgets don’t have the budget to pay an RN so they train us to do the job under their supervision.

So, I’m learning a lot of new things. How to take in and administer medications for students in my school. How to deal with angry parents who didn’t educate themselves. How to follow new procedures. How to deal with “politics” in the office and how to create healthy boundaries so that we all do our jobs in a cooperative, collaborative and happy environment.

Today I taught myself something else new. I learned to crochet!

I learned it by watching this most excellent tutorial on Youtube! It’s provided from All Free Crochet (dot) com and Nastazia … check them out (since I can’t teach crochet just yet!)

My first attempt was nowhere near a square shape. The sides were all sorts of wonky.

First Attempts

First Attempt

It was supposed to be a washcloth or dishcloth but I didn’t have the proper size of crochet hook. My hook was somewhat smaller and so was my swatch … so we’ll call it a coaster! 🙂 I also used cotton rather than acrylic (because if my dishcloth had been dishcloth size, I would certainly not have wanted it to be acrylic … acrylic doesn’t really absorb! Anyway, my first attempt (which isn’t well photographed) looks much better here than it turned out. It was the most oddly shaped piece of work EVER! So, I frogged it and started again.

I’m super pleased with my second attempt!

Second Attempt

Second Attempt

My second swatch is a real square and it has fairly decent tension. Tah! Dah!

I guess I am going to have to take a trip to Joann’s now to buy some larger metal crochet hooks so I can keep learning … it is a lot quicker than knitting and some of the new patterns that I have been seeing (in crochet) are so cute. I have been threatening to learn for so long. It’s about time I finally just did it!

And now I am feeling proud!

I can crochet … the Queen Bee Knits and Crochets, too!

Gone shopping!

Certification Interview Butterflies

Queen Bee Knits Original Design - Baby Sweater

Queen Bee Knits Original Design – Baby Sweater – for CYC Certification

I’m awaiting the phone call from my CYC (Craft Yarn Council) Master Teacher who has received all of my Level 2 Knitting Certification materials! I’m a little bit nervous and anticipating that I did well because I’m a good knitter. I’m a good knitting instructor, too. I know this but I am also human and, as such, I have that tiny kernel of doubt or the concern that I made a mistake.

When we put ourselves out there to be critiqued by another person, it’s humbling. It makes us feel, in the process of having our work judged, a little bit judged ourselves. But having put the effort into the work and knowing that I can do it all, I am eager, too, to grow from the experience.

But I do have butterflies in my stomach!

Gulf Fritillary ... Mating Season

Gulf Fritillary …
Mating Season


Which reminds me of this photograph that I took at school this week.

We have a butterfly garden in the center of the campus. Our class has watched the eggs on the leaves, hatching into baby caterpillars and then growing into big fat caterpillars and then forming the “J” of the chrysalis. There are butterflies in the garden now and these two are mating. They are a beautiful bright orange butterfly when in flight but when sitting on a branch, they are nearly invisible with their coloring.

Gotta love Mother Nature!

Gone knitting!

PS – I passed my level 2 certification this afternoon. Yay, me! What a fun conversation with my master teacher!