Unknown's avatar

About Queen Bee Knits

Living in Maine, knitting, baking and loving my family. Please be kind!

Selling Hand-Knits – Sale!

I have an online shops (or two) and I have an inventory of knitted items that are all done and ready to go to their new forever homes. They are currently listed in two online shops (some may not be listed yet. I really have to check my storage box!)

When I price items that I’ve knit, I (obviously) have to recover the price of the yarn and other direct costs that I incur. It’s always nice, after that is taken care of, to make a little bit of money for my time. I never “really” get paid for my time. Nobody could afford to buy a garment that would accurately reflect the time that is lovingly given as I make each of the garments that I sell. Sometimes, I make a couple of bucks. It’s all good.

So, for the big holiday week, I am offering all of the already knitted items that I have in my storage container inventory at 25% off! That’s right … basically, I’m getting my money back for the supplies … the money that I’ve already shelled out … and you’re getting some great hand-knitted by the Queen Bee garments. And, considering the crazy weather we’ve been having, you may be able to wear it now!

You can click here to be magically transported to my 3 B Street shop! Use coupon code “FRIEND” and you’ll get 25% off anything purchased between today and Thursday!

Thanks for shopping & reading and Happy Passover & Easter!

Gone knitting!

Writing Your own Pattern – A Scarf

This Princess Scarf article (that I cannot read) has a photograph of a lovely scarf on the Princess of Norway’s neck. It’s a variegated pink yarn that is quite lovely with the background being her black and white outfit. (I tried, I really did, to get the photo inserted here. No luck! That’s why you have to click and go to see the scarf. It’s worth it, I promise, it’s very pretty!)

So, the big question here is, how do you knit a scarf like this?

IMG_0310The first challenge, obviously, is to find a similar yarn. I’d suggest printing the picture and heading out to your local yarn shop. It doesn’t matter what “weight” of yarn you choose because I’m going to tell you how to write your own pattern. But what you do need to know is how to find yarn that will mimic the scarf so that you won’t have a scarf that looks NOTHING like the Princess’!

The “Princess” scarf has a short color change. The pink and pink or pink and cream colors are fairly consistent across the knitted cloth in short lengths and nearly looks like it is “tweedy” or “mottled”. So you’re going to look for yarn that has short color changes. This yarn looks like it’s a lighter weight than a “chunky” or “bulky” yarn and is likely worsted or sport or even sock weight. It’s also a smooth yarn rather than a “thick and thin” or “slubby” or “fun fur” or even of a fiber that has a “haze” like angora or mohair. If you like another color, this is the time to choose color wisely – make sure you love it!

I went online to Jimmy Bean’s Wool and found a couple of different yarns that might work: Madelinetosh Prairie Short Skeins Yarn in Fragrant or Universal Yarns Bamboo Pop Yarn in Pink Joy. The first is a fingering weight and the second is a DK weight. Neither color is exactly like the Princess’, but both would work. Obviously, one will be lighter than the other. Take into consideration how cold it gets where you live! (I live in Florida and it’s not very cold here. Ever!)

needlesOnce you’ve found your beautiful yarn, you need to match it with an appropriate sized needles. The Princess’ scarf is not lacy or open, the stitches are close together. The yarn band or tag will tell you the needle size recommended for your yarn. Sometimes there is a choice (it may say on a size 1-3 or 3-5). Next you need to mix up your yarn and needles by making a swatch. You can read my post about swatching here! And there is a great article on Knitty here. Now you’ll be able to see how your yarn is knitting up and see how many stitches you need to cast on!

Now, it’s time to decide how wide you want your scarf to be. I’m guessing that the Princess’ scarf is about eight inches wide. But you can make yours as wide or narrow as you like (and you can even start, frog and start again if you don’t like it. I give you permission!)

The Universal Pop yarn says to use needles size 5-7 and I’ll get 5-6 stitches per inch. Measuring my gauge, let’s say I get 5 stitches per inch on my US 5 needles. And I want my scarf to be 8 inches wide. I need to cast on 40 stitches. (5×8=40).

For this scarf, I’m going to use a stockinette stitch (knit on the right side, purl on the wrong side) and I’m going to continue in this pattern throughout. It looks like the original scarf is pretty long – and I’m going to knit my scarf until it’s about the same length (or the length I like) and then cast off on the right side.

Ta Da! You have just designed your very own scarf!

A couple of tips …

1. Your edge will be much prettier if you slip the first stitch in every row. Slip it purlwise or knitwise but be consistent!

2. Block your scarf! (See my post about blocking here!) It will hold its shape and the sides of stockinette stitch fabric are famous for rolling. Blocking will help it to unroll … but if you look at the Princess’ scarf, you’ll see it does roll a little bit! 🙂

Gone knitting!


Wonderful Wallaby – Pattern Review

Image 4I taught the Wonderful Wallaby pattern by Carol A. Anderson as part of the classes that I offered at the Yarn Nook in Lafayette, LA earlier this month. This pattern is so great that I want to make one for myself (and so did the owners of the Yarn Nook … another uniform piece?)

The pattern reads a bit like a story and has cute illustrations. I had a bit of difficulty finding the place in the pattern booklet where they told me what I needed to get gauge and others did, too. But it is there. You may have to “hunt” a little. Once you’ve gotten your gauge swatch knitted and are set to begin, the pattern is clearly written and well written. I have had no difficulty following most of it. I did do and re-do the part where you pick up stitches at the bottom of the “pouch”/pocket. If I had actually READ the pattern, however, it would have been done properly the first time!

I decided to add a bit of a different yarn to my sweater (I knitted the smallest size, a 2T) and make the pocket/”pouch” a different color and I also started the sleeve ribbing in the coordinating yarn. Once done with the body of the sweater, I also decided to use the coordinating yarn for the collar ribbing and on the 5 stitches that border the hood. I wish I had added the coordinating yarn at the first row of the neck stitches in the yoke. (For the children’s sweater, this direction is on page nine at the bottom.) I’d have begun the coordinating color yarn at the place where you purl the ten center stitches between the markers on the front of the sweater.

Students who took this class made good progress and each sweater was very unique. One student was making a green sweater with a pink pouch. Another was making a baby blue sweater with blue and pink stripes on the pouch. They were all cute! One poster on my Facebook pages said that this was her favorite children’s sweater pattern ever. I might be willing to agree with her after knitting this pattern.

The yarns that I used were Berroco Comfort Solid in a beige color (3 skeins for my size) and Classic Elite’s Liberty Wool in a beige/lavender/grey/green colorway. I love knitting with both yarns on this sweater. The Berroco yarn is not too heavy and is washable. It’s worsted weight and not too “splitty” (my pet peeve for yarn!) I think for a child’s sweater, it has to be washable … what mom wants to wash their child’s sweaters by hand? As with all knitted items, I’d suggest drying it flat. Liberty Wool is a soft wool yarn and I love the colorways. I wanted to take home a couple of balls of each just to play with. This yarn is a looser wrap and can split so be careful knitting with it but you’ll love the way it feels. And the way it looks, too!

I am totally pleased with my Wonderful Wallaby and will be sending it on to a very special little girl in our family … she’s going to have a bunch of hand-knit sweaters from her auntie when she is a little bit bigger! Her collection keeps growing … because I keep finding sweet little patterns to knit for her! I have another project all lined up for when I finish one or two!

You can purchase the pattern at your LYS (local yarn shop) or online at Amazon.com or Cottage Creations. You can also call Cottage Creations at 641-324-1280. The pattern is around $7.00 … a great deal considering you get from size (child) 2-T through an adult XXL or “super size”! Trust me, you’re going to want to knit one of these for every member of your family! And don’t forget to check out the different styles and colors that have already been knitted on Ravelry!

Gone Knitting!


Organize Your Cords

Not vocal cords, not electrical cords, not all those cords that are around your desk. This is a great way to organize your cords for interchangeable knitting needle sets!

Typically, you’ll buy a set (or better yet, get them as a gift like I did at Christmas time – thanks, Glenda! I love you.) One of my sets comes in a special collectors’ box and I can’t imagine taking them all out to organize because they looks so pretty! But if you’re buying extra cords or want to travel with all your needles and no boxes, this is a tip for you!

Julie's AMAZING organization!

Julie’s AMAZING organization!

Can you see it? Julie’s clipped her cords with a little binder clip. Genius!

Here's a single cord so you can see it even better!

Here’s a single cord so you can see it even better!

And even better, check THIS out!

IMG_1152

Geez, my thumb looks wrinkly!

Julie’s used some white out pen to mark the cord length on the binder clip. You could use white out pen or there are also those terrific paint pens that would probably be a bit more permanent.

I just loved this idea and couldn’t wait to share it with you!

Gone knitting!


More from the Yarn Nook

I have promised more pictures – and I have a few but have to apologize for not taking enough during the two weeks and 21 classes (I think). We had a few classes that didn’t go but it was a busy time and I thoroughly enjoyed my “Visiting Instructor” (I’m not  comfortable referring to myself as a “knitting expert”yet) visit!

I’m so proud of all of my students (over 60 of them!) who gave their best, tried to stay positive and who came into class willing and eager to learn. We knitted toe up socks, cuff down socks, sweaters, dresses, vests, fingerless mitts, flowers, shawls, learned about finishing and fixing mistakes.

Here are all (yes, all … I told you I didn’t take enough!) the photos that I took … happy viewing!

IMG_1134

Toe Up … Lesser Evil Socks

IMG_1144

Bermuda Shawl (in process)

IMG_1156

Angelise and her Maddie’s Little Dress

IMG_1157

Barbara and her Fuzzy Feet

IMG_1158

Hilda’s Wonderful Wallaby Sweater

IMG_1161

Winnie and her Maddie’s Little Dress

IMG_1162

Kitty and her Maddie’s Little Dress (nearly finished!) in LSU colors

IMG_1163

Another Maddie’s …

The view from "my" chair ...

The view from “my” chair …

I am so grateful for the opportunity to teach all of these wonderful women and am eager to return to teach again … and will be back as soon as I can. I’ll be reviewing the patterns that we knitted and the yarns that we used in some future posts. I also learned a really wonderful storage tip for those pesky cords that go with your circular needles (particularly the interchangeable sets!) that I will be sharing with you soon.

Gone knitting!

Miranda’s Lesson

IMG_1147This is Miranda and the mermaid sweater that she knitted. She knitted it without a pattern. She’s been knitting for about a year. Let me make sure you hear what I’m saying (writing?) … She designed the sweater by herself. Without a pattern! She found the mermaid online and knitted it into her sweater with only about a year of experience. Note that each sleeve is different: One with a two-color cable and the other with fish swimming around the cuff end. I am simply in awe of such a fearless knitter.

I was fortunate to meet Miranda at Knit Night and also to have her in a class last week. She picks up a concept very quickly and even if she is struggling with size 1 (US) needles and sock-weight yarn, she has a great attitude. Telling herself “I can do this” just quietly enough that I could hear her but not loud enough to hear throughout the shop. And I think what I’ve learned from Miranda is that if we practice encouraging self-talk, we can do anything that we want. We should not fear trying new things.

Learning hexipuffs

Learning hexipuffs

Miranda’s attitude is in stark contrast to some of the adult students who don’t share the same habit of cheering herself along through a challenging project or technique or just something new. We learned hexipuffs, i-cord … and that when we use positive self-talk, we can accomplish much more than if we beat ourselves down because we aren’t immediately proficient at a task.

A good lesson and an impressive teacher. Thanks, Miranda!

Gone knitting!


“Can Do”

I have so enjoyed my teaching experience so far.

Today we had a short day – one class and then lunch with the Yarn Nook girls and off we went to sit at my brother & sister-in-law’s house on the back patio and knit! (Like we don’t get enough of it!) It felt good to have a short day after yesterday which was our marathon knitting and teaching day. We will probably not stay all day next week when I have three classes! Even crazy old me needs a break!

I love the challenge of teaching a student who is really stretching herself in a class. Challenging herself to do something that is really difficult and, perhaps, even something that she may not be ready to attempt yet. Those fearless knitters are the ones I admire. Partly because it’s so gutsy. Partly because I was not that type of knitter. Or at least that’s not how I classify myself.

There is a lot to be said for trying something that’s really difficult. It’s good for our brains, it’s good for our souls. The sense of accomplishment is incredible when you finally “get it!” I am happy with the progress that all of my students have made. They’ve worked hard. They’ve (mostly) had that “can do” attitude and it’s such fun to be teaching such a great group of women!

Gone knitting!


Teaching Cajun-Style!

I told you that I was teaching for two weeks at the Yarn Nook in Lafayette, LA.

Well, let me tell you, they love to knit in Cajun Country! I have been teaching this week and have enjoyed meeting all of my students. I’m impressed by the number of people who are excited about learning to knit and their dedication.

So far, though, I am most impressed by the 18 (or so) women and one young man who came out to the Knit Night at the Yarn Nook tonight. A lovely evening that included fun and fellowship and knitting  and crocheting and also dinner – lovely pulled pork sandwiches and chocolate cake all cooked by Suzette while she worked at the shop today! It was such fun!

I promise that I will start taking pictures and posting photos of my students and their knitting! I know you’re all wondering what we’re up to down here!

Gone knitting! (Well, actually, I’m going to sleep!)

No More Knotted Ear Buds

Knitted I-cord Ear Buds by Queen Bee Knits

Knitted I-cord Ear Buds by Queen Bee Knits

It’s been awhile since I saw knitted ear buds somewhere on the Internet. I’ve thought about knitting a little “sweater” for mine (so they don’t always get tangled into knots) but, frankly, it hasn’t been high on my to-do list.

But today I guess I needed something brainless to do since I’ve been working so hard on class planning and samples for the classes that I’m teaching in Louisiana. SO … I started work on my ear buds. It’ll be helpful when I’m driving for two days because I don’t like to drive with my phone in my hand.

Basically, I am knitting an i-cord around the ear bud cord. I found this free tutorial on the blog Wonderfully Awkward and I know that there are patterns out there as well if you want to search.

I’m using my Lorna’s Laces Sport in the Spats colorway – it’s left overs from the Jimmy Beans Wool Downton Abbey Mystery Knit Along. I’m using a US 2 DPN which makes my stitches tight enough that I can’t see the white cord through the knitted fabric.

Casting on 4 stitches and started at the bottom of the cord near the plug, I’m just stitching an i-cord all the way up to the split. There I will increase a couple of stitches and then hold half the stitches on a stitch holder for one side while I wrap the other side. (Very simple. If you’ve never knitted an i-cord, I’ll have to write a post about that some day soon but for now you can Google some help! There are several decent tutorials both written and video to help you.)

There you go – that’s what I am up to today!

Gone knitting (i-cord!)


The Anatomy of a Sock

Circle of Life Socks

Circle of Life Socks for baby – pattern by Cat Bordhi

As I was sitting here in my atelier last night, I started thinking about how much people know about socks. I’ve knitted quite a few socks; baby socks, short socks, bed socks, yoga socks, cabled socks, patterned socks … toe up socks, cuff down socks, socks on DPNs, socks on two circs, magic loop socks … you get the general idea. Right?

Turkish Bed Sock

Turkish Bed Sock by Queen Bee Knits – pattern by Churchmouse Yarns

Well, what are the parts of a sock? Do you know what they’re all called? If you’re a knitter like me, you may … or may not! So, let’s do a post about the anatomy of a sock.

Whenever I’m preparing to write a post on knitting, I go out to the internet to search the topic. I searched the internet “Anatomy of a Sock” and this is what I found. A wonderful article, entitled Sock 101, already written beautifully by Knitty – a great resource and some fun free patterns – so I don’t have to write it myself. I can merely comment and compliment the Knitty article. Because there’s no use recreating the wheel, right?

Knitty's Picture of the Anatomy of a Sock

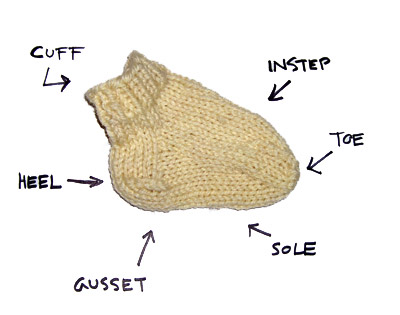
Knitty’s Picture of the Anatomy of a Sock

There it is. The perfect picture of the anatomy of a sock! Perfect!

Depending on the pattern that you’re using, you may start at the toe or the cuff. Everyone stresses (at least when you’re a new sock knitter) about turning the heel. The beauty of it, however, is that all socks have all the same parts. Once you know the anatomy of ONE sock, you know it all! It’s beautiful, isn’t it?

Birthday Party Socks - by Queen Bee Knits

Birthday Party Socks – by Queen Bee Knits

If you haven’t knitted socks yet, you really should give it a shot – they’re so satisfying to knit and when they are finished and you put them on your feet or give them to someone as a gift, it’s amazing. They fit so well, they feel so good. And as a gift, they’re not soon forgotten – a true labor of love.

A personal sock story and then I’m going to end – I bought a ball of sock yarn with the idea that I’d make them for my son (then a freshman in college) because the colorway was similar to tiger stripes and he’s a Cincinnati Bengals fan – hey, no comments necessary, we lived his entire lifetime in Cincinnati! When I told him I was making him socks, he sweetly(-ish) told me he didn’t want hand-knit socks. Because I had the yarn, though, I didn’t pay attention and knitted the socks and gave them to him for Christmas one year.

Who Dey!

Who Dey! Socks by Queen Bee Knits

He graciously put them on his feet on Christmas day. Then, awhile later, I got a call from him,

“Mom, about the socks you knitted for me …?”

“Yes?”

“I love them. Will you make me some more?”

Like a good custom shirt or suit or whatever else is made specifically for you, hand made socks are super special. My brothers, boyfriend, niece and at least one daughter have pairs of their own. My goal is to knit some for all of my family. My son has three pairs that I’ve made to his request … including a brown pair that have a short cuff, a black pair and the Who Dey! socks that were his first. We all know that our first is something special!

The anatomy of a sock. There you have it. Now go get your yarn and needles and start knitting a pair! A good place to start is with Knitty’s Fuzzy Feet … worsted weight yarn and on a large scale. One step at a time. You can do it!

Gone knitting!