Sockhead Hat #2 … My Way

The love of my life has no hair on his head. It never occurred to me that these men who are folicly challenged need a hat even when it seems warm to me. His little head is cold. Who’d have thunk it!?

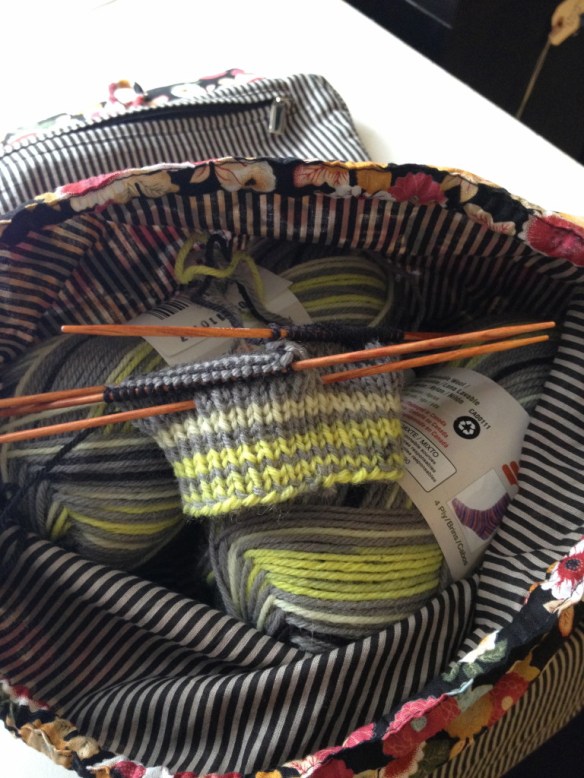
I’ve knitted several hats for him and some with greater success than others. His current favorite is a beautiful silver-gray worsted weight cap. It’s perfect … when it’s a little cooler than it is right now. So, he needs a lighter-weigh hat. We’ve looked at many (MANY!) patterns and pictures and we’ve settled on a “shorter” less-slouchy version of the Sockhead Hat by Kelly McClure or a one-color version of the Scraptastic Hat by Jane Tanner, both free patterns on Ravelry.

We also went through the sock yarn in my stash (remember, I’m on a serious yarn diet!) and found a pretty red/blue/purple Cascade 150 Paints Sock Yarn (Bordeau Blend – out of stock in most places – Color #9768 Lot #1454). It’s a lovely soft merino and nylon mix (75%/25%), it’s washable and I’m positive it won’t be itchy. And the yardage is fabulous. I think I may still be able to get a pair of short socks made after the hat is finished or a pair of fingerless mitts.

My Maine friends were surprised to see me knitting a hat with sock yarn but they’re thinking winter hats and I’m knitting a spring hat. Men without hair have special needs!

Gone knitting.

New On the Needles

Worsted Boxy

Worsted Boxy

I started my Worsted Boxy by Joji Locatelli on Sunday when we were driving to visit my nephew in Massachusetts. I’ve had this beautiful Seacolors yarn (in three colorways) for two years. It was knitted into a free pattern for a cardigan that came with the yarn but I really didn’t like the way the sleeves fit (or didn’t fit) into the body of the sweater. You get what you pay for, after all. Anyway, I frogged the cardigan and have waited all this time to knit something new. I loved the Boxy sweater and, lo and behold, there is now a worsted-weight Boxy on Ravelry. We’ll see how it goes.

A Gift in the Mail

A Gift in the Mail

At long last, the yarn that my daughter sent from Chicago to Florida AGES ago, has been forwarded to me and has arrived in Maine. It was postmarked in mid-April, for heaven’s sake! I’ve promised her that I’ll make her some dishcloths or washcloths with it … and I’ve cast on for the first one which will be Grandmother’s Favorite which is free on Ravelry and a very simple, quick knit. What I like about this pattern is that it’s not fussy and it holds up to abuse.

I’ve still got two sweaters to knit – one a tunic/dress and another that I haven’t figured out what pattern to use (yet!) I’m still working on using up some of the stashed yarn that I’ve collected over the years. I will be pulling out the yarn and starting on the afghan squares as soon as the dishcloths are finished.

Gone knitting!

Needles, Needles, Needles

I’m working a lot knitting socks. Trying some new patterns and trying different needles, too.

Knitter's Pride Dreamz DPN

Knitter’s Pride Dreamz DPN

I have a set of new Knitter’s Pride “dreamz” 6-inch double pointed needles in US1 (2.25mm) needles and they’re going to help me knit up some wonderful socks using  Susan B. Anderson’s “How I Make My Socks” pattern and Patons Kroy Socks in Spring Leaf Stripes colorway (that I’ve had in my stash for a few months.) I am really liking these needles. They are smooth but not slippery. The tips are pointy enough but I’d like to have a little more tip … they are almost rounded off at the tip rather than pointy and pointy is better when you’re using fine yarns. At this price point, however, they are very reasonable and they are nice to work with.

Signature Needle Arts DPN

Signature Needle Arts DPN

My other socks are on my Signature Needle Arts 6-inch US1 DPNs. (One of which I seem to have lost already. I am hoping that I left it at the office on Friday and that I will find it when I return tomorrow. You’ll understand why one would worry about the loss of one needle when you are told that I paid $48 for a set of four needles. Thus, one needle is valued at $12 which, by the way, is more than a set of 5 Dreamz needles.) The yarn that I am using is Gale’s Art Wonder Sock in the Graffiti colorway. I love this yarn’s color and it was one that I fell in love with and went to buy immediately after casting my eyes upon it. That doesn’t happen often. The Signature needles, while pricey, are worth every cent. I love the stiletto points and the yarn slips easily over them without slipping off them. I’d say that these are my favorites and I will collect more as my pocketbook allows.

I’ve had many (many!) sets of needles over the course of my knitting career. From the “cheap-o” needles that you can buy on sale at the big box craft stores to my pricey Signatures. I bought my first boxed set of needles at a half-price going out of business sale in Cincinnati, Ohio. I thought spending $50 for a set of Denise Interchangeable Needles was a huge expense. And I loved the needles. Until I discovered Addis! Addi cords were so much more flexible and they’ve been through several iterations since my first circular needles. One summer I bought a set of HIya Hiya needles (around $70- $80?) and I fell in love again. The transition between the needles and cords were much smoother than the Denise needles and the single circs that I bought here and there. No matter what brand of bamboo circular needle I seemed to buy, the transitions were often rough.

And then one  year I took some classes with Annie Modesitt and discovered Signatures. I’ve often asked for them for my birthday and Christmas and mother’s day, too. I tend to buy 40″ circulars because I can use them in magic loop in so many applications. I have one pair of straights and one pair of their DPNs. They are all magnificent and the tips are nice and pointy.

Limited Edition Knitter's Pride Dreamz (well worn!)

Limited Edition Knitter’s Pride Dreamz (well worn!)

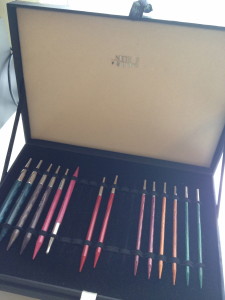
I was gifted one more lovely set of needles a couple of Christmases ago. They are a limited edition set of Knitter’s Pride Dreams interchangeable circular needles. They have been so well used for so often (and taken with me when I travel or teach) that the box is starting to show some wear. I love the needles. The cords are nice and flexible and the transitions are mostly smooth. I have a couple of needles that are not as smooth as others. But, over all, this set is a decent price point and they are pretty colors and they are great to knit with.

Needles, like friends, are a personal choice. We all have our favorites or besties. None are “bad”, some are better for different projects. Have you ever travelled with a friend who you can only take in small doses or one who snores? It makes travel a challenge! Needles are the same! When you have the wrong needles, your project will be a challenge. I like to use bamboo with “slippery” yarn (like mohair). I use circulars for almost everything these days but I still like to knit socks on DPNs, too.

Variety is the spice of life, right?

Gone knitting.

On the Needles

I finished my taxes so I treated myself to a new  project!

The Atchafalaya Swamp

The Atchafalaya Swamp

When I was in Louisiana for Spring Break, I taught a couple of classes at the Yarn Nook. It’s a really wonderful shop in Lafayette, LA and it just so happens that my sister-in-love works there. When she knew I was coming for a visit she told the owners and they invited me to teach a class. It is humbling to have them ask me back and I was thrilled to accept.

Teaching aside, Wednesday was a work day for my sister-in-law, Kathy. And of course I went along! Who wouldn’t want to spend the day in a yarn shop?

While I was there, I wandered the shop to check out the yarn, bags, and all the good stuff. I happened to notice a Churchmouse Yarns pattern for a mohair striped wrap. I loved the colors, the feel of the yarn and, the fact is, I’m moving to Maine from Florida and I’m going to need warm clothes. So, all my teaching money (and then some) went to new yarn and pattern rather than gas! I purchased four balls of Rowan Kidsilk Haze Stripe in four different colorways. I’m knitting it with my Knitters Pride Dreams circular needle (US 7) because the yarn is very slippery and it would slip right off my Signature needles!

"Graffiti" Sock #1

“Graffiti” Sock #1

I have a pair of socks that I’m knitting from Susan B. Anderson’s “How I Make my Socks” pattern. The yarn is one that I saw on Susan’s Instagram feed and went immediately to buy from Gale’s Art on Etsy in the Graffiti colorway. I am loving the way the yarn is knitting up and I love the sock pattern. The first sock fits like a glove. (Well, not really, it fits like a sock. And it fits perfectly!) The pattern is super easy to follow and the socks are knitting up in a jiffy!

Frontenac

Frontenac

My Frontenac vest is knitting up bee-utifully and very quickly due to the bulkier weight yarn that I bought. The yarn is Berroco’s Inca Tweed in two colorways: 8901 Playa and 8934 Noche. One is a beige or camel color and the other is a slate gray. The front and over the shoulders will be beige and the back, gray with a turtle neck. It’s a quick and simple knit thus far and I am looking forward to wearing it over a turtleneck shirt with long sleeves when we get up to Maine! Inca Tweed is a yummy soft yarn with just enough tweedy flecks in it to make it interesting. It’s got a little bit of thick and thin going on and it’s not split-y or annoying to knit with. I’m loving this project!

Still in time out is the Lobster Hat that I started up in Maine last summer. It’s a testament to the fact that I don’t like color work and, particularly, I don’t care for carrying the yarns behind the work. I find it tedious. Maybe because I’ve not done enough of it and my tension is sometimes inconsistent but I will finish it one of these days (or years).

I frogged the Olivia Cowl that I started. I was knitting it with some bee-utiful light blue worsted-weight yarn from Swans Island Yarn Company. The yarn is too pretty to be knit into something that I don’t love. Olivia is frogged. The yarn is waiting for my calling.

On my queue are a few other projects … worsted-weight “hiking” socks for my sweetie, a sock-weight hat for him, too. I have a dress that I want to knit, too. And a “boxy” sweater, probably a cardigan, to knit for me. Of course, when I finish my second graffiti sock, I’ll have to start another pair!

Gone knitting!


A Hare Pair (Rabbit Hat by Jane Terrza)

IMG_4456I have had this ball of white-ish yarn (Oasis Farm Fiber Mill “Bunny Yarn”) in my stash for years. It’s tried to be a scarf a couple of times and, subsequently, frogged. I had set it aside because I didn’t know what it wanted to be. Until I saw the Rabbit Hat by Jane Terrza on Facebook one morning a couple of weeks ago.

I have two adorable nieces in northern California and I just HAD to make the Rabbit Hats for them for Easter!

I used the following yarns from my stash for the hats: Oasis Farm Fiber Mill Classic Bunny in white. I had two skeins that I wound into one huge cake. I used about half of the two skein cake for both hats. (Don’t you love knitting for children and babies?) I needed something pink for the inside of the ears in a similar weight. I had a skein of Lorna’s Laces Sportweight wool in a very pale pink (pale pink colorway, I think) that I won in a contest for a soapbox package. It was perfect!

First Hat

First Hat

The first hat was the larger of the two and I made it as the pattern was written with a kitchener stitch graft at the top of the hat and reverse stockinette on the inside of the ears (the pink part).

Reverse stockinette inside the ears

Reverse stockinette inside the ears

The pattern was easy to follow and the hat is adorable. The hat is knit in the round and the ears are knit in two pieces each from stitches placed on stitch holders. Once knitted, the ears are seamed. Easy enough.

What I found “awkward” was that all of the decreases for the ears were all done as K2tog. It seemed to me that the top of the hat could be more easily seamed with a 3 needle bind off rather than kitchener stitch and be nearly as pretty (and take a lot less time to seam). I guess it will be up to you to decide what you want to do but I wanted to share with you what I did with the second little hat for the baby sister!

Hat 2

Hat 2

I knit the hat just as the pattern was written. (I happen to love a little rolled brim on a hat!)

The changes that I made came in the top seam and the ears.

For the top of the hat, I did a 3 needle bind off. Next time I would turn the hat inside out first but I am not unhappy with the little seam on the top of the hat. I took a bit of time to adjust the stitches onto holders … I had to knit the first six stitches to get the yarn into the right place to bind off the top of the hat but otherwise, it was a cinch!

I knit the ears with a K2tog (knit two together) decrease for a right-leaning decrease on the left sides of the ear pieces and a SSK (slip slip knit) decrease for a left-leaning decrease on the right sides of the ear pieces rather than always using a K2tog decrease as written in the pattern. I think this looks a little bit prettier.  I also was thinking about treating the ear as one piece circularly and carrying the contrasting yarn across. I decided to seam them instead to save the yarn. (Hey! I am a Yankee at heart!)

Stockinette inside the ears … by mistake but it still looks cute.

Stockinette inside the ears … by mistake but it still looks cute.

Because it was the second hat, I wasn’t paying attention to the pattern directions and totally forgot about the reverse stockinette on the inside of the ears. As a result, they are stockinette stitch. And it’s fine. Bonus! I find the seaming easier this way.

Since I was using natural fibers, I steam blocked both hats and made sure the pink insides of the ears were “hugged” by the creamy white backs of the ears all around. I think they are adorable and can’t wait to see my little nieces wearing them!

A Pair of Hare Hats … blocked and heading to California!

A Pair of Hare Hats … blocked and heading to California!

Which one do you like best? The pattern can be found on Ravelry and is a minimal charge … buy the pattern and support the designer!

Gone knitting!

K1FB Increasing Without Tears …or those pesky little “purl bumps”

This morning I happened across a video for adding a stitch in your knitting without that funny little purl bumpy thing that happens when you knit one into the front and back of the stitch (K1FB). I have gone back to try to find the video but I can’t find it. So, in my own inimitable fashion, I’m going to attempt to show you, dear patient readers, with words and photographs what the video said.

There are many increases to use when you’re knitting. The “quickest and easiest” is K1FB or knit one into the front and back of a stitch. You can use this increase when you see “M1” in a pattern but I’d recommend that you use this as a generic increase rather than a M1 (make one).

When you get to the place where you need to increase, you are going to knit into the front of the stitch (which I’ve already done in the photo below) and then, without dropping the stitch off the left-hand needle, you’re going to knit into the back of the stitch. The photo below shows the stitch that I am adding by knitting into the back … I’m ready to wrap and then slip the stitch off the left-hand needle.
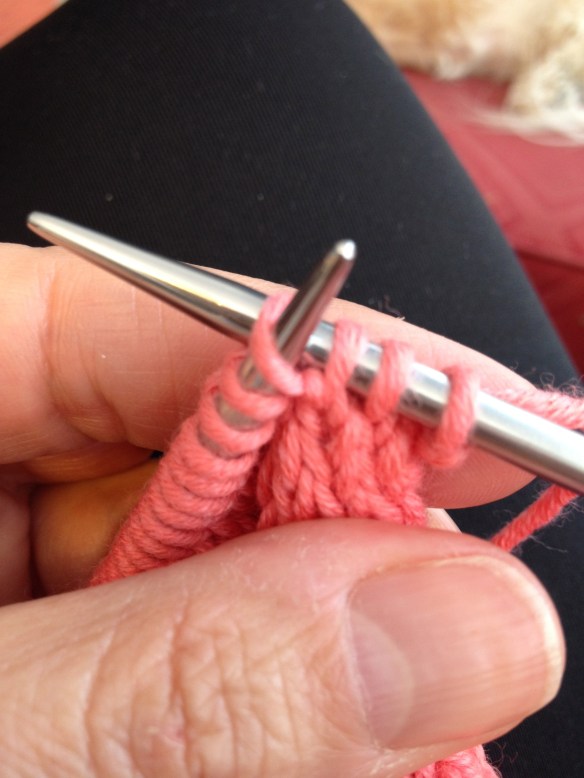
I've knitted two stitches and am knitting into the front and back of the third stitch. I've already knitted into the front and now I'm knitting into the back.

I’ve knitted two stitches and am knitting into the front and back of the third stitch. I’ve already knitted into the front and now I’m knitting into the back.

OK, so, I’ve wrapped the yarn around the working needle and slipped the stitch off the left-hand needle and this is what it looks like. There are my three “old” stitches and my “new” or “added’ or “increased” stitch. (Remember the first stitch is the the one to the right in the photo. The added stitch is the left-most stitch, the stitch just worked.)
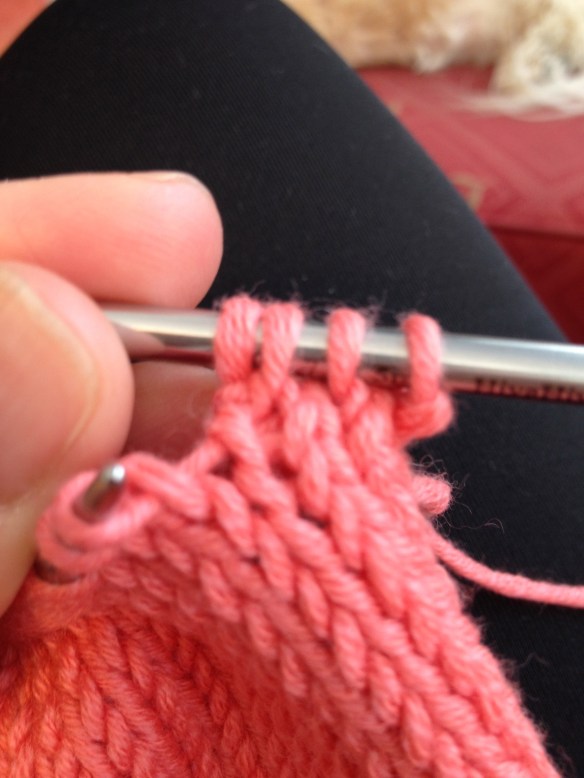
Three stitches is now FOUR! But can you see the "purl bump" on the fourth stitch (the left-most)?

Three stitches is now FOUR! But can you see the “purl bump” on the fourth stitch (the left-most)?

So, we’ve accomplished our goal which was to increase one stitch. That stitch, however, isn’t invisible because of the little purl-like bump that is sitting in front of it. There’s nothing you can really do about it. And most times when you increase using the K1FB method, you’ll be increasing close to the side of a garment and those stitches will be swallowed up in a seam and will be virtually invisible after seaming.

BUT there is a way to make the stitches less visible and this is how you do it!

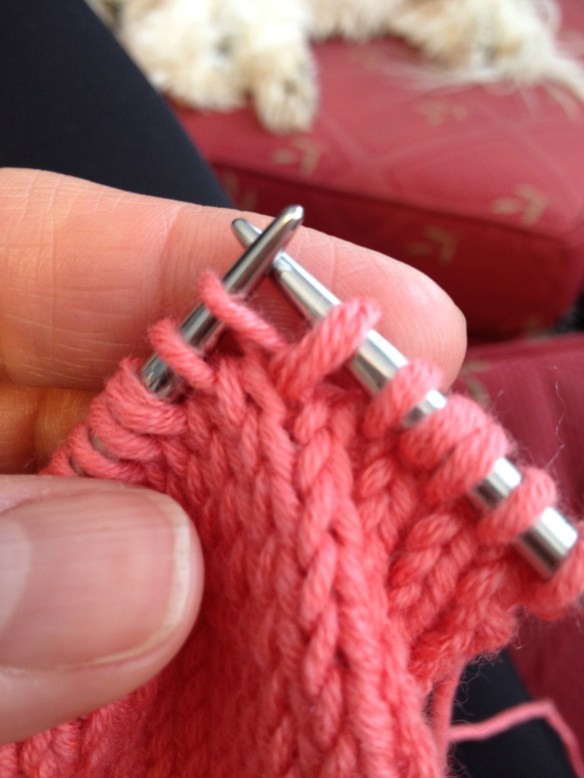
The first step is to knit into the front of the stitch but (again) don’t slip the stitch off the left-hand needle. (This is the exact same as the K1FB that I illustrated above.)
IMG_4271

When you get to the stitch where you want to increase, knit into the front of the stitch.

The second half of the stitch needs to be reoriented so that the stitches don’t wrap around the front of the work. So, you’ll slip the next stitch knitwise by inserting the tip of the right needle from left to right (just like you were knitting the stitch) and slip the stitch from the left-hand to the right-hand needle.
IMG_4273

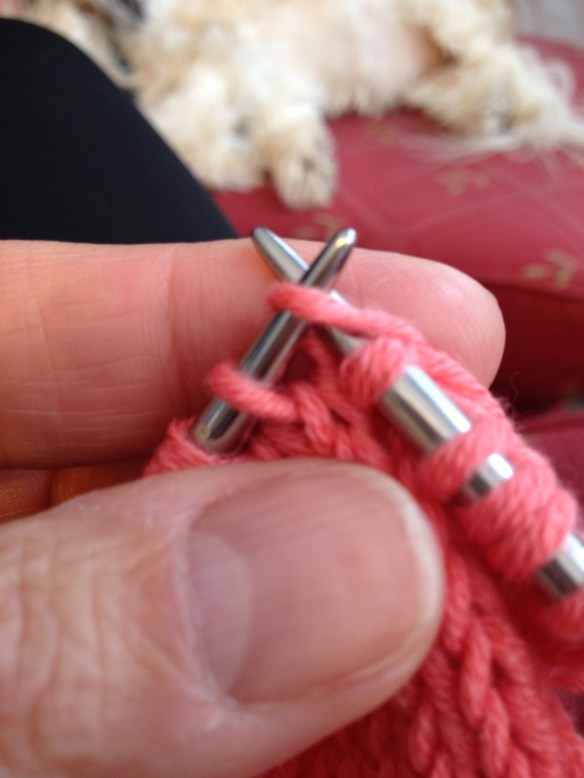
Next, insert your working (right-hand) needle into the front leg of the next stitch to be worked on the left-hand needle knitwise.

I know it sounds confusing, but I am at a disadvantage not being able to film myself in a video here! It forces me to find the right words to explain the process clearly and that’s good for both of us!

Next you’re going to slip the stitch back onto the left-hand needle to finish the process. Insert the tip of your left-hand needle purlwise into the stitch you just slipped to the right needle. Slip the stitch back to the left-hand needle.

IMG_4274

Slip the stitch purlwise back to the left-hand needle … you’re almost there!

All you’ve done is slipped the second part of the stitch increase from the left to the right knitwise (as if to knit) and then back from the right to the left purlwise (as if to purl). This has reoriented the legs of the stitch so that when you (next!) knit it, the stitch isn’t wrapped with yarn (and it doesn’t look as much like a purl bump.)
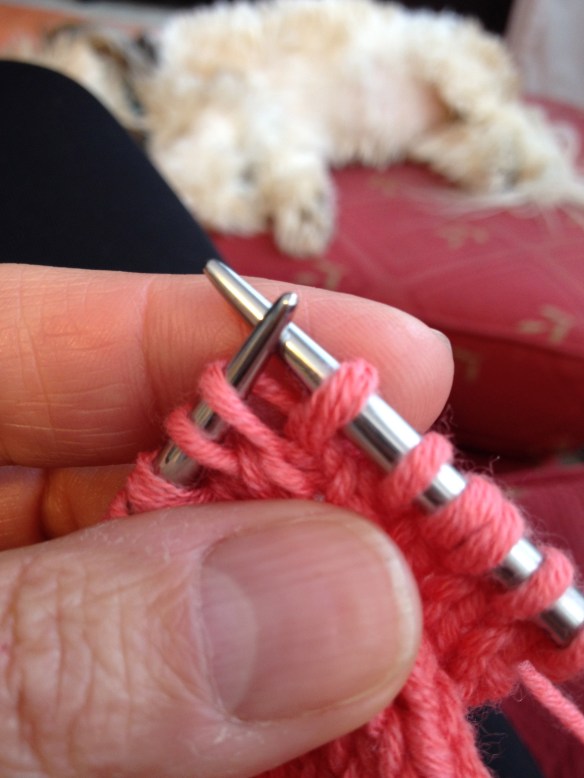
IMG_4275

This is how your reoriented stitch looks … and now you are going to knit it.

Go ahead, knit the stitch and slip it off the left-hand needle. There! You have increased one stitch.

If you look at the next photo now, you’ll see that there is a “normal” K1FB increase and a K1FB increase where I’ve changed the orientation of the increased stitch.
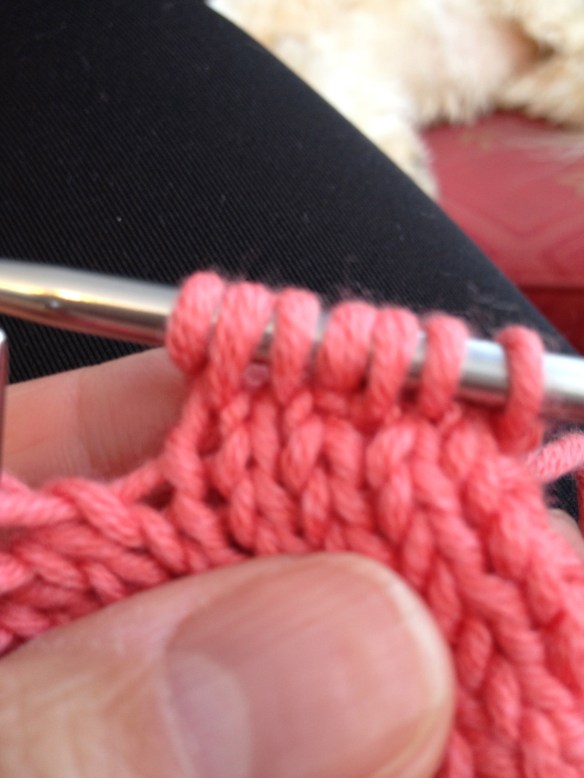
IMG_4276

Reading from right to left: K2, K1FB (the old way where it looks as if the fourth stitch has a purl bump), K1, K1FB (the new way with changing the orientation of the increased stitch.)

See! No purl bump thingy! Now I’ll purl back across the stitches and you can see the fabric again …
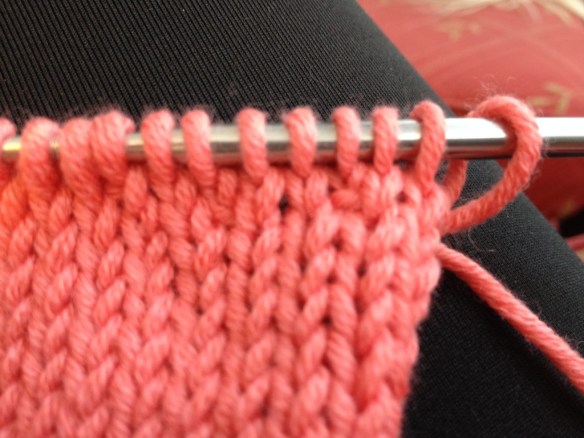
IMG_4279

Again, reading from right to left you’ll see three knit stitches, one knit stitch with the “purl bump” below it and another two knit stitches and a new stitch from our reoriented K1FB.

There you have it! Two ways to increase in your knitting with K1FB (knit one front and back).

The first increase in stitch #3 (read from right to left) was the “old” knit one into the front and back of the third stitch which creates a fourth stitch with a “purl bump”. This is an excellent way to increase! Super quick and easy, just a bit visible in some circumstances.

The second increase in stitch #7 is done similarly but with a little twist of the second half of the increase where we reoriented or changed the orientation of the stitch before knitting it. This creates an added stitch without a wrap or “purl bump”. It’s pretty cool, isn’t it?

Learning to read your stitches is essential to your success as a knitter. I’m getting more skilled at it every time I take on a new project and teaching has helped me tremendously. This photograph, however, is such a clear one … and I get all excited.

When looking at this last photo, I can see the stitches added! Take a good look. The stitches in a each row are all lined up like a v on top of a v. Nice and neat! You can follow the stitches up in the center of the v. Where the increased stitches are added, it’s a little bit squeezed and the pretty symetry

VVVVV

VVVVV

VVVVV

When we increase a stitch, it squishes an extra stitch into the nice neat lines.

vvVvvVV

VVVVV

VVVVV

It’s a good attempt to illustrate with my limited illustration skills. I think. 🙂

Now that you’ve seen my excellent illustration, go back and have a look at the last photograph (I’ve added it below for you). Start at a stitch on the needle and follow the “v” down the rows. See how they line up? And can you see where the increased stitch just kind of pops up out of nowhere? It doesn’t have a nicely stacked column of “v”s to sit on top of … it’s just out there. The first K1FB increase (with the “purl bump” below it) stands out a lot more than it’s “cousin” the second K1FB “with a twist” but similarly, it just kind of gets nestled in between two stitches … each of the stitches has its column of “v”s but the increased stitch is sitting out there without a column. Can you see it now? Isn’t it exciting? You’re reading your knitting!

IMG_4279

Read your knitting!!! Stitches are sitting in a column of “v”s; row sits squarely on the row below it … until you have an increased stitch!

There you have it! How to make a K1FB increase without having that wrapped stitch that looks like a purl bump. I am such a knitting geek!

What else do you want to learn about increases?

Gone knitting!


Hat for Haley … a Chemo Princess

Princess Hat

Princess Hat

I had a message from a friend in Ohio requesting a chemo hat to be made for a friend’s three year old daughter who has cancer. As I’ve said before, maybe not here in the blog, the words cancer and child should never be seen in the same sentence.

When a special friend asks and because my three children are healthy, I agreed to put aside my personal knitting and make a gift for a little girl who faces some yucky days. I needed to know her name and her favorite color. I had some fun purple (Haley’s favorite color) yarn in my stash and I went over to Ravelry to look for patterns.

I was originally thinking about a striped hat that I’ve made before. It’s a great hat. I’ve made a couple of them to donate for fund-raisers or whatever. Although, this old girl forgot, it seems, to take any photographs of them. Oops!

Anyway, I was looking around and found a lot of cute hats … and then I found THE hat.

I knew it was perfect (and I had just put aside some sparkly gold specialty yarn that I have had for ages to see if someone in my knitting group wanted to use it.) So, I pulled out the gold yarn and my stashed purple Cascade 220 and I got started.

The hat is called “Princess Crown” and can be found, free, on Ravelry. It’s one of many adorable patterns in Allison Stewart-Guinee’s Fairytale Knits book. And it was just perfect. I knew it in my heart immediately. What little girl doesn’t love to wear a crown?

Purple is Haley's favorite color … and this is more like the actual color of her Princess Hat

Purple is Haley’s favorite color … and this is more like the actual color of her Princess Hat

The hat knitted up very easily and has just a touch of lacey-ness in the body of the hat which carries down the hat making it look as if it’s a real crown. The golden crown part is knit up separately on circular needles and then stitched together with the hat. Once together, the band is knit and it even has a pretty picot edge stitched right in.

Because the format on the Amazon site is supposed to be laid out as a book, it can be a little bit confusing to follow. Just beware! I did get lost at one point and had to frog and re-knit a couple of rows. If you can follow the format of the pattern, though, the pattern is clearly written and simple to knit. It looks like you’re an expert, too!

Wet blocking so the hat has some shape!

Wet blocking so the hat has some shape!

I have wet blocked the hat and used a large handful of plastic grocery bags as a form to have the purple “hat” part block out. I can’t wait for it to dry so I can get it into the mail! I hope Haley is going to love it and that it brings her smiles on the crummy days when she doesn’t feel well. There’s lots of love in that little hat and it’s all heading to Ohio and Haley!

Gone Knitting.

Travel (Jet Blue) Blues

I travel with two adorable and helpful dogs. They are both Registered Service Animals. I don’t want to go into a lot of personal details but they are my little helpers. All sorts of animals provide services to people with disabilities … visible and invisible … dogs, cats, rats, snakes, horses and others, too.

Yesterday, like every time I fly, I started by presenting my ID and documentation for my dogs. The good people at Jet Blue held me at the ticketing desk for at least 20-25 minutes. Questioning me and, at the end, telling me that I could take them both on the plane “this time” but that in the future I needed additional documentation. Jet Blue will allow me to have one dog per “affliction”. I’ve been traveling with the two dogs. both registered (I provided a doctor’s note and veterinary note to get them registered) in the same bag for eight years with no problems … until yesterday. Apparently Jet Blue holds sway over the ADA who says that I can travel with my documented Registered Service Dogs.

I was a wreck. Anxious that they would not let me fly home without paying for an additional seat for my “extra” dog to sit under. Or that they would refuse me the right to board the plane. Or that I would miss my flight because of their delays.

Fortunately, I will not have to fly again for awhile, and when I do fly again, it will probably be on good old Delta where, when I show my documentation, I am not delayed and discussed everywhere I go. If only these people at the gates were better trained to be compassionate, life would be so much less embarrassing.

Gone knitting!

Getting Projects Finished! (And Sewing, too!)

Sunrise over Messalonskee

Sunrise over Messalonskee

Well, my time in my happy place is coming quickly to an end. Last Wednesday I said, “good-bye for now” and “see you next summer” to my knitting friends. It’s always sad for me to say good-bye to my knitting friends both here and in Florida.

I had my last day sewing with my friends Beverly and Lorry yesterday. We finished a project for Lorry to take to her friend in France and I made another great bag (with a lot of help.) It’s fabulous and I love it. I love it because it’s a team effort and that my friends found three of the five fabrics for me when they were on a road trip to a quilting shop in New Hampshire. Four fabrics with bees and one with flowers and a lot of patience and I have a bag that I will carry in the winter months. Full of the love of my friends here in Maine.

My Wonderful Wallaby is almost done. I’m just knitting the hood which is simple  stockinette stitch all the way to the Kitchener stitch at the top. I took a break when I got to the neck to try it on and it fits perfectly. I’m so pleased that I have lost a little weight because now it’s perfect. Just the way I like it. Now my sweet man thinks he’d like to have one, too.

IMG_3465I finished the darling striped baby cardigan and the booties for my niece-to-be. I even bought the buttons. I’ll have to sew them on tonight so I can post a picture here. The booties are Sue’s Bootie’s and the pattern was begged for (by me) at my knitting class. They no longer had it at the shop and I couldn’t find it on the internet. They are adorable and super easy to knit. I loved the combination of colorways that my friends were using and I followed their lead using two different colors of Fixation. Fixation, if you don’t know, is slightly elastic and makes great baby booties and socks and it’s difficult for the baby to kick them off … well, relatively difficult anyway.

I’m ignoring the fingerless mitts that I dragged all the way from Florida to Maine … and will drag all the way back, too.

"Lobster On the Rocks" Hat designed by Donna Frost Ritchie

“Lobster On the Rocks” Hat designed by Donna Frost Ritchie

I’m slowly making progress on a lobster hat for my daughter. It was going to be for her birthday but it will be a late gift … thank heavens I have another couple of months until it gets cold in New York. I’m thinking that perhaps color work is not my thing. But I’ll keep trying.

I have a wonderful stash of yarn to take back to Florida with me and work with over the next ten months until I can be back here again. With any luck, my whole atelier will be coming with me then because we’re moving here permanently. This is where my heart lives.

Gone knitting.


Button, Button. Who’s Got the Button

Basic Baby Raglan Cardigan Sweater

Basic Baby Raglan Cardigan Sweater

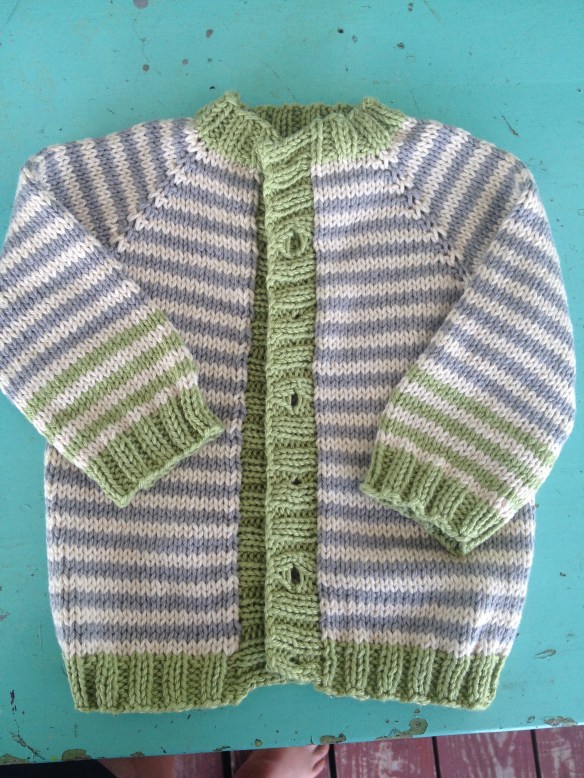
The adorable baby sweater is finished except for the buttons.

The pattern used a yarn over (YO) to make a small button hole and it’s a bit odd … thus, it’s going to be a challenge to find an adorable girly-not-too-girly button (times seven). I’ve tried several that I thought would work and they don’t.

Again. The pattern calls for a 3/4 inch button … they seem a little bit to big. And anything other than a smooth circular or near-circular button gets caught in the button hole. Grrrrr!

I am sure that I’ll win at this battle. I can always make my own buttons but I’d like to find something sweet for my niece-to-be.

I chose to use a Knit Picks yarn, Comfy Sport, which was wonderful to work with. I love the way it feels and the colors are great. Price point is very reasonable at and it’s washable. I think that knitted gifts for babies have got to be washable. You can check out the colors that I used on my Ravelry projects page.

This pattern was free on Ravelry and it’s a very simple knit. A beginner could certainly make it … especially if one made it in a single color. Stripes are not difficult but carry the yarn as you go because there would be a ton of ends to weave in if you don’t. With my three colors there were enough ends and I carried the yarn as much as I possibly could. I made the 3 – 6 month size. It required one ball of each color and there isn’t much yarn left. Once it’s blocked and buttons are sewn on, I’ll post another picture. I just need those buttons.

Anybody got any ideas?

Gone knitting.