Just So Bag – Finished and Perfect!

Here it is! I’m finished and ready to fill it up and use it as my purse for the next few days.

The Just So Bag by Andrea Babb. I’ve blogged about it here and here. It’s in the Interweave Knits Winter 2012 or you can download the patter from Ravelry.

IMG_3322

I found the oak half-inch dowels at Home Depot. My better half measured twice and cut once and we got perfect 15 inch handles. The little balls at the end were found at JoAnn’s in Waterville. Four in the package. How convenient!? I’m leaving them unfinished and will “seal” them with furniture wax. I like them just the way they are!

Here are a few more views…

IMG_3324

I needed to have a pocket for my phone and pen and pads … otherwise they fall into the black hole never to be found again. The fabric (I love it!) came from Quilt Diva in Rockland. They had several wonderful bee fabrics and I am kicking myself that I didn’t buy a yard of each for the future! I’ll have to go back!IMG_3323

I’m very happy that you can see the lace stitches. Next time, I’ll use pure wool. No more mohair in lace knitting. (Besides, I think I am allergic to it.)IMG_3322The only thing that I may add is a cardboard bottom. If I do, I will cover the cardboard with my bee fabric and then tack it down to the bottom of the bag. It does sag at the bottom!

Gone knitting!


Finishing the Just So Bag

As I was seaming the Just So Bag, I looked at my bag and I looked at the pictures on the pattern and realized that the pattern had a different “hem line” at the bottom than the regular seam that I would have sewn. Mine was just a typical seam connecting two stockinette pieces and was nearly invisible. Pretty but not striking. The problem was that I liked theirs better.

So, what’s a knitter to do when the directions don’t give you the information on how to make a project look exactly like the one in the pictures on the pattern?

I fiddled with it for awhile and in the end, I am very happy with it. Here’s what I did. (Sorry, I didn’t take a photograph of the seam I didn’t like but it was smooth and I liked her piping-like seam that bumped out a little bit.

You’re going to start with the bottom strip and one of the side pieces both placed on a table with right sides facing up. (You can do it on your lap, too, if you want.) Grab the first stitch on the bottom strip as you normally would seam together two pieces of stockinette (grabbing the “v”). This is all you’re going to do on the bottom piece all the way along the seam. Easy peasy.

On the bottom strip, seam as normal

On the bottom strip, seam as normal, using the inverted “v” of the first row of stitches.

The “side” piece is where we’re going to drift away from “normal” seaming in order to get the little “piping” effect like on a sewn cushion. You are going to turn sew into the wrong side of the fabric. Inserting your needle into the left side of the first row of purl bumps.


One of the two side pieces. See the row of purl bumps just under the cast-on edge?

One of the two side pieces. See the row of purl bumps just under the cast-on edge?

You’re going to sew up on the left side like this.

Sew up on the left side of the purl bump.

Sew up on the left side of the purl bump.

And then just come down on the right side of the purl bump and then you’ll grab the “v” in the next stitch of the bottom strip. Repeat this process all the way across the bottom edge of your bag. (And then you have one more seam to sew on the other side… practice!)

Here’s what my bottom edge looks like. I am quite pleased with it!

Pretty "piping"!

Pretty “piping”!

Gone knitting.

I’m the Queen Bee and it’s Been Over a Month Since I’ve Posted.

Welcome to Maine

Welcome to Maine

I can’t believe that I haven’t posted anything in over a month! I’m sure I’ve thought about it many times … apologies to my loyal followers (all three of you!)

I was a sick puppy!

I was a sick puppy! Out of work for five weeks!

I’ve recovered from a nasty bout with pneumonia and bronchitis and finished the school year and moved up to our home in Maine. I’ve also started a new “diet” to try to lose some weight before the big wedding (not mine, my daughter’s). I have been way to “happy” (read this as eating for all celebratory reasons) for the past several years and have gained a good forty pounds since my divorce diet and weight loss. I’m hoping to get back to that post-divorce weight without severing a long relationship. I’ve enlisted a team of coaches and doctors and am starting day 6, having lost about six pounds. Woo! Hoo! The program that I’m using is Your Road To Health. It’s a Medifast program. I was hungry and cranky the first few days but I’m feeling better as the days go on. Today I am feeling hopeful and that’s a really great way to feel.

I’ve been knitting a lot, too. Have several projects on the needles. I’ll go into more detail over the next few days. Suffice it to say, there is no shortage of projects – and the ones that have deadlines are the ones that I don’t really feel like working on.

I’m almost done with the lap blanket for my daughter’s wedding (there will be rocking chairs on the Yacht Club’s porch and she really wanted to have a cozy blanket on them … it could be chilly in September in Massachusetts.) Bulky yarn knits up pretty quickly … even if it’s a boring project.

Wonderful Wallaby sleeves … two at a time.

Wonderful Wallaby sleeves … two at a time.

Closing in on Row 70 … a bazillion rows left!

Closing in on Row 70 … a bazillion rows left!

I’ve kind of given up on the idea of finishing the lace shawl by her wedding. But maybe not.

I started a “selfish knitting” shawl … one of those projects that I can work on at knitting classes because I don’t have to count.

One mitt down, one to go.

One mitt down, one to go.

I have one of my two fingerless mitts done. An Intarsia pattern. I have decided I need to practice intarsia more … not my favorite technique. One left … and I haven’t even started it yet.

Wonderful Wallaby sleeves … two at a time.

Wonderful Wallaby sleeves … two at a time.

Last, I have a Wonderful Wallaby sweater that I am knitting for myself. Another easy pattern that  I can knit and visit with. I have the majority of the body done and am working on the sleeves. Would love to finish this before the end of the summer so it can live here in Maine. It’ll be way too warm for Florida.

My super-duper LL Bean bag is full of yarn and “hopeful” knitting projects. If I can finish even some of my projects already on the needles, I can start those. A sweater for my soon-to-be niece, a sweater for the soon-to-be big sister, an Australian possum pelt kit … OH BOY!

And then there's this project! A king-size Log Cabin quilt!

And then there’s this project! A king-size Log Cabin quilt!

I’d best stop writing and get knitting!

Gone knitting!

My Favorite Thing


imageThis little pair of cat scissors is on of my favorite things.

I bought them at my LYS here in Orlando for less than $10. They came in several colors.

Ive added a longer chain to mine so I can wear it around my neck. But it’s wonderful. And I imagine that I can take it on airplanes if I so choose and still be able to cut my yarn! Woo! Hoo!

Gone knitting!


I Hate it When This Happens

Happily knitting along on my Wonderful Wallaby and my right hand feels a lump.

I hate it when this happens!

I hate it when this happens!

Thankfully, I’m knitting with wool and since it’s a natural fiber, I can do a “spit join” and it will be a seamless (and end-less … read this as no ends to weave in) way to keep on knitting.

To do this, all you have to do is:

1) cut out the knot with your handy dandy scissors

2) separate the plies from each end of the yarn

3) mine was 4-ply. I cut out two plies from each end of the yarn

After separating the plies, cut out half of them & wet both ends and lay them together again

After separating the plies, cut out half of them & wet both ends and lay them together again

4) “spit” on the yarn (or dip it into some water) and hold the two ends together and rub them between your two hands. The heat and agitation will bind the fibers … like magic!

Magic! Ready to knit on!

Magic! Ready to knit on!

5) knit on!

Gone knitting!

Fannar by Shannon Okey (aka knitgrrl)

Yarn - Cascade 220  (Color #9401 Lot #0739

Yarn – Cascade 220 (Color #9401 Lot #0739

I am nearly done with my first test knitting “job”. It’s been a very rewarding experience, and beyond the knitting, I’ve been privileged to “meet” some wonderful and fun knitters. Enough so that I am hoping they’ll take me up on my offer to host a knitting retreat at our house in Maine next September (2015).

My pattern is called “Fannar” and will be in the new book, coming out soon, called “Frozen: Aurora Borealis Mittens.” (No, I didn’t get paid, since I know you’re all wondering!) When I received my yarn, “ordinary” Cascade 220 in a lovely ivory and grey tweed, I immediately felt some relief from my perceived design-envy. First lesson learned: You don’t have to use exotic (aka pricey) yarns when you design! Who knew!? I was so excited that I nearly tinkled! 🙂

The fabric - unfelted

The fabric – unfelted

The initial pattern that I was sent was a chart. Now, I’ve knitted from charts many times before but never for an entire pattern and it was intimidating for about ten minutes. Until I realized that I knew this! I know this! I had it covered and I could do it. And I cast on with a provisional cast on to leave some live stitches for the cuff.

I knitted up the largest size and after I’d reached the thumb crotch my gut was telling me that this puppy was absolutely over-the-top humongous! I sent a photo to Shannon and she, too, was amazed at its girth. So, I frogged the behemoth and we started from scratch. As Shannon was out of town, Andi stepped in and whipped up an entirely new mitten pattern. And I started knitting again … this time a more appropriate size, even knowing that it is going to be felted.

Thumb Gusset (part deux)

Thumb Gusset (part deux) – way more normal!

The second iteration of “Fannar” is much more normal and the knitting process is super quick. Since I got the one-color mitten, I think I got the easiest job in the book. It’s been super fun to follow the secret Facebook group and watch as other test knitters knit their patterns. And to learn about the comment threads via email, used to communicate. It makes me want to knit more color work. That may be my summer challenge.

I’m wrapping up the second mitten and will finish the second thumb today. Then my job will be over. I can’t wait to see the finished product – the mitten will be felted in Ohio and a cuff will be knitted on afterward (thus the special cast on). I think I am going to have to knit up a pair for myself and felt them and see how it turns out … just for sh#$s and giggles!

What an excellent experience!

Gone knitting.

Pouches Rock!

My second Wonderful Wallaby is off the needles. This one for my sister-in-law to give to a friend who is expecting a new baby in April. She requested it in pink … and since I was at the Black Sheep (teaching), I ran right back to the yarn room to see what was available in a baby-friendly pink that’s not too pink. (Because as much as I love pink for little girls, I also know that they get a lot … a LOT … of pink gifts.) And voila! I loved this one …

Ta-daaa! My yarn choice!

Ta-daaa! My yarn choice! Plymouth Yarn “Encore Tweed”

Knitting for babies and children really requires washable yarn. I sometimes break this rule … especially when I’m knitting for people who I know well. But when I am knitting for people I don’t know, I assume that they’ll want garments that are easy to care for. Thus, acrylic or blends are essential. The yarn I chose is Encore Tweed by Plymouth Yarn. It’s a worsted weight blend of 75% acrylic, 22% wool and 3% rayon. Stretchy, soft, washable … and a great price point at $7.50 a ball (I needed three. Color W464, Lot 67839.)

I decided to make the smallest size possible which is a 2T because if the baby is born in April, she will be 8 months old in December and with rolled up sleeves, this size will likely fit well with a little room for growth. I always put my children in sweaters that grew a little bit with them. Because I was knitting a gift, I did knit a swatch for gauge. If it was for me I might not have done that but I wanted it to be sized accurately. And away I went.

Bottom's UP!

Bottom’s UP!

This sweater is constructed from the bottom up and knit in the round. (Hear this, NO seams!) The instructions are very clear and easy to follow. Two needle sizes needed. Sleeves can be knit one- or two-at-a-time which is my preference so that they are sure to be the same size. I’m sorry that I didn’t take a photograph of my sleeves in process. On this particular pattern, I like using scraps of yarn to hold the few stitches for the underarms both on the body of the sweater and the sleeves. (Makes the “pits” very flexible.)

Here’s a great tip! If you start with the sleeves, you can consider them your swatch. For those who don’t like to swatch, you can start your project right off and if your gauge is off you have a lot fewer stitches to pull out.

Splitting up for the neckline

Splitting the stitches for the neckline … and then on to the collar and hood!

The sleeves are attached very simply by stitching them onto your needles along with the sweater body. Decreases all around for the shoulders and we’re getting closer and closer to a finished garment.

At the neckline, the stitches split and you knit back and forth for the neckline and hood (if you choose to add one … and I love children’s hats with hoods!) Again, very simple. The only “glitch” that I can see in the pattern is that there is a repeat of a few knitted stitches on the edge of the hood, which I am too much of a perfectionist to accept. So, I chose to knit all of the edge stitches on one side and purl all edge stitches on the other side. That way, I get a “perfect” edge. You’ll see what I mean when you knit this cutie!

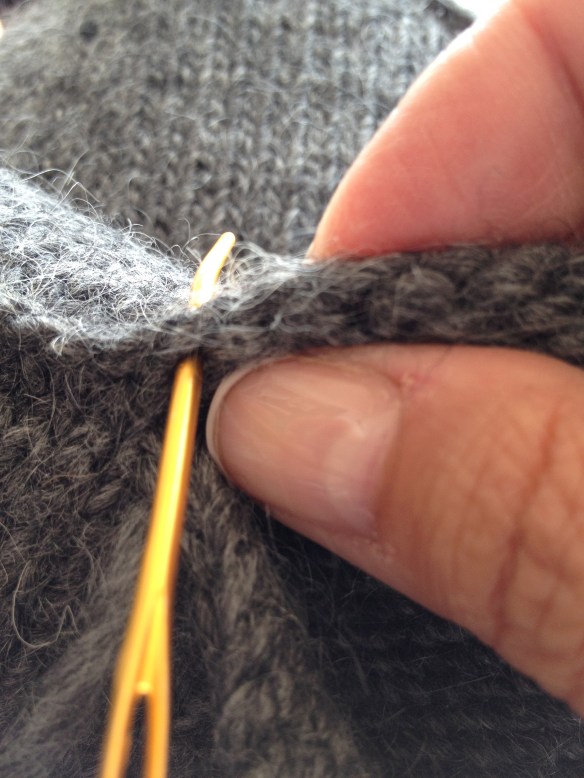
At the end of the hood, you’ll graft all the stitches together with a Kitchener stitch and ta-daa!!! I added a tassel to the hood because I really liked the hassle that I added to the first WW that I knitted for my niece. All you have to do is graft the underarm stitches and all the seaming is done. Don’t you love that!? I sure do! Use a long piece of your seaming yarn to tighten up the “holes” at each side of the underarm. This is a trick you can use in lots of patterns.

IMG_0021

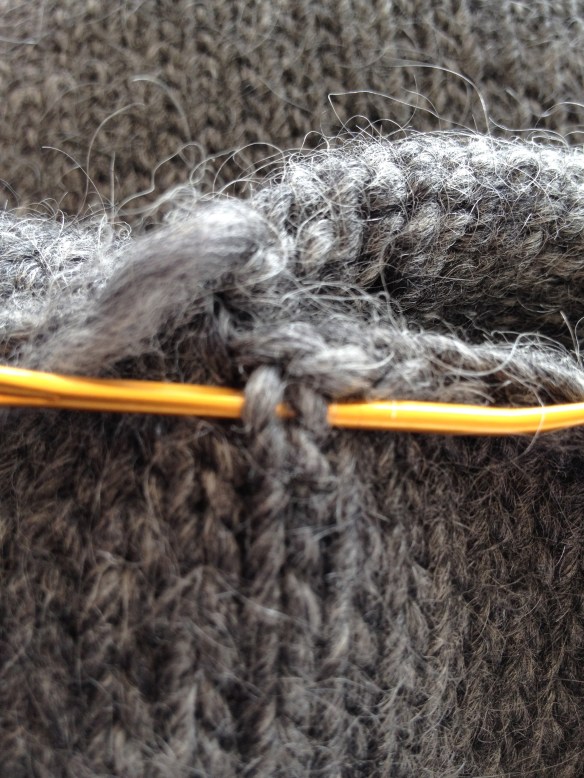
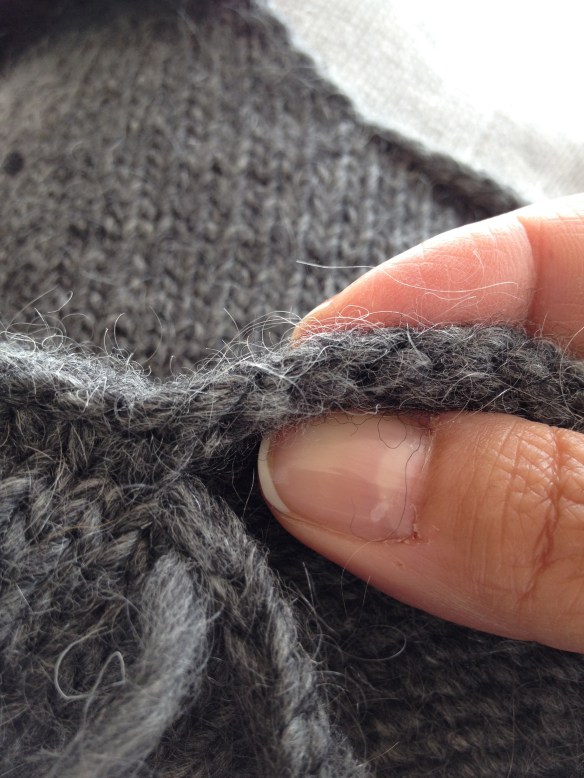
Just a few underarm stitches to graft … that’s it for seaming!

Underarm "holes" are easily tightened up!

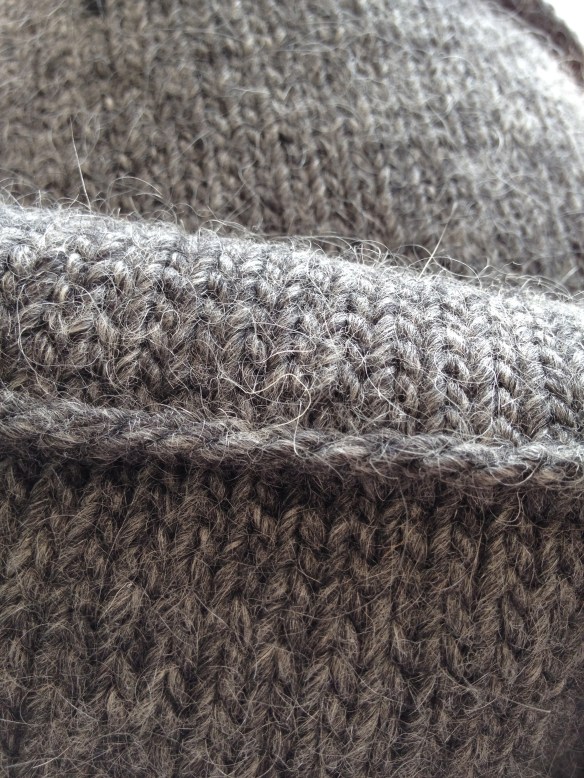
Underarm “holes” are easily tightened up!

So, there you have it once again. The Wonderful Wallaby. I love this pattern so much that I am knitting one for myself in oatmeal-colored wool. You can be sure you’ll be seeing it when it’s on the needles!

Wonderful Wallaby in pink!

Wonderful Wallaby in pink!

Queen Bee Knits label is placed on the inside of the bottom … don't want it rubbing baby's neck!

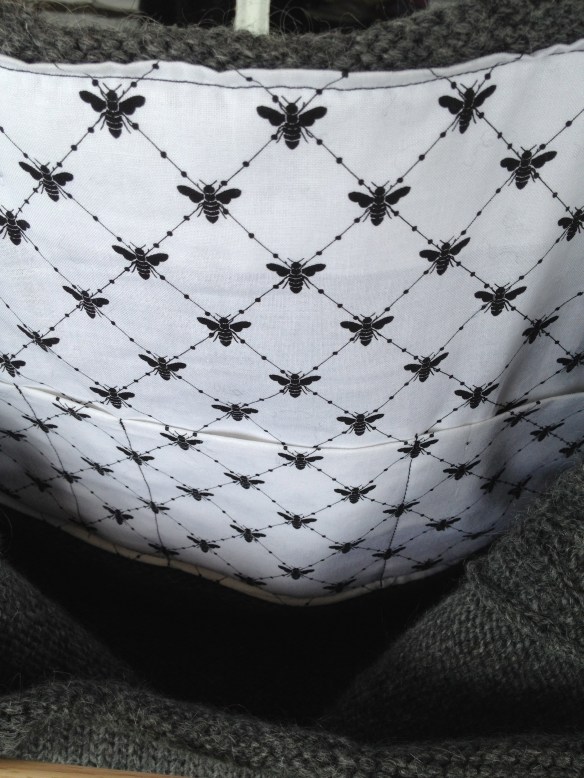
Queen Bee Knits label is placed on the inside of the bottom … don’t want it rubbing baby’s neck!

Tassel … my addition

Tassel … my addition

Gone knitting.

Block Broken

My first Wonderful Wallaby on my beautiful niece!

My first Wonderful Wallaby on my beautiful niece!

I taught a class ten days ago and, now, I do believe that my knitters block is broken. Woo! Hoo! I’m knitting again!

Zipping through the Wonderful Wallaby that I’m knitting for my sister-in-law to give to a friend for a new baby due in April. (I’ve blogged about this pattern that I’ve knitted before … here and here.) I’m knitting it in the acrylic/wool/rayon blend Plymouth Yarn Encore Tweed (100g./200 yards) in a pink tweed (color W464/ lot 67839). I love this pattern and I love this sweater. It’s such a simple knit and there are no seams! (Well, only a couple of short seams.)

And next? A wedding shawl for my daughter … I sure hope she doesn’t read this blog! 😉

I can’t believe that MY daughter is getting married (in September)! It’s beyond my comprehension that she is old enough for this … or maybe it’s that I am old enough for this … monumental, life-changing event! How did all those years pass so quickly? And now it’s time for her little family to become “official”. We all love the wonderful man that she is marrying and I love that they are authentically themselves even as they’ve become a couple. I remember her telling me (years ago) that he was her “tour affair” and the relationship wouldn’t go beyond the boundaries of her tour. Love got in the way … and it didn’t hurt that he loved her dog!

I’m planning to knit her a Romi lace shawl, Fiori di Sole. It just looks like her. I bought the yarn in Bangor, Maine last summer. It’s a beautiful shade of blue/green (Glacial Pace is the color way) baby alpaca and silk blend by One Lupine and called “Spinnaker” (4oz./ approx. 745 yards). I am excited to get started which is, perhaps, why I am whipping through the Wallaby in pink.

Let me mention, too, that I’ve begun a Wonderful Wallaby for me! I’m knitting in Lion Brand’s Fisherman’s Wool, an inexpensive yarn purchased at Joann, in the oatmeal color way … there will be no contrasting pocket for this girl! 🙂

Gone knitting!

Selling Hand-Knits – Sale!

I have an online shops (or two) and I have an inventory of knitted items that are all done and ready to go to their new forever homes. They are currently listed in two online shops (some may not be listed yet. I really have to check my storage box!)

When I price items that I’ve knit, I (obviously) have to recover the price of the yarn and other direct costs that I incur. It’s always nice, after that is taken care of, to make a little bit of money for my time. I never “really” get paid for my time. Nobody could afford to buy a garment that would accurately reflect the time that is lovingly given as I make each of the garments that I sell. Sometimes, I make a couple of bucks. It’s all good.

So, for the big holiday week, I am offering all of the already knitted items that I have in my storage container inventory at 25% off! That’s right … basically, I’m getting my money back for the supplies … the money that I’ve already shelled out … and you’re getting some great hand-knitted by the Queen Bee garments. And, considering the crazy weather we’ve been having, you may be able to wear it now!

You can click here to be magically transported to my 3 B Street shop! Use coupon code “FRIEND” and you’ll get 25% off anything purchased between today and Thursday!

Thanks for shopping & reading and Happy Passover & Easter!

Gone knitting!

My 3 B Street Shop is Open for Business

So, I’ve been knitting my fingers off for a couple of years between custom orders and have a lovely bunch of knitted garments … fingerless mittens, scarves, shawls, hats, socks and the like that I have wanted to photograph and get into my online shop.

Then, a year or so ago, I got a call from Laurie Barron (her mother was my eldest daughter’s junior high school English teacher and we have become friends) who was starting her own version of Etsy but without all the “extra” stuff. And the stores were going to have to apply and be “juried” so-to-speak. It keeps the workmanship levels up and the quality of the items in the shops is really high. Within the last few months, 3 B Street shops were in Beta mode and then went live!

Yesterday, we photographed my entire box of knitted items and I uploaded them to my shop. I hope you’ll agree that it’s a great sampling of knitted items and I am (as always) willing to knit just about anything custom for you, dear reader.

Without further ado, please visit my Queen Bee Knits shop at 3 B Street (dot) com. I hope you like it and always welcome  your feedback!

Gone knitting!